Activities and venues
Where: the Activities and Venues menus of the administration. Who: administrators and editors.
These two screens keep two lists up to date, which you then reuse every time you create an event: the types of activity the centre offers (classes, retreats, prayers…) and the places where they happen. You do not create events here: you prepare the choices that will appear on the edit screen of each event.
Both screens have the same layout, like WordPress post categories:
- on the left, the add form;
- on the right, the list of what already exists. Hover over a line to Edit or Delete; clicking the name opens the full edit screen.
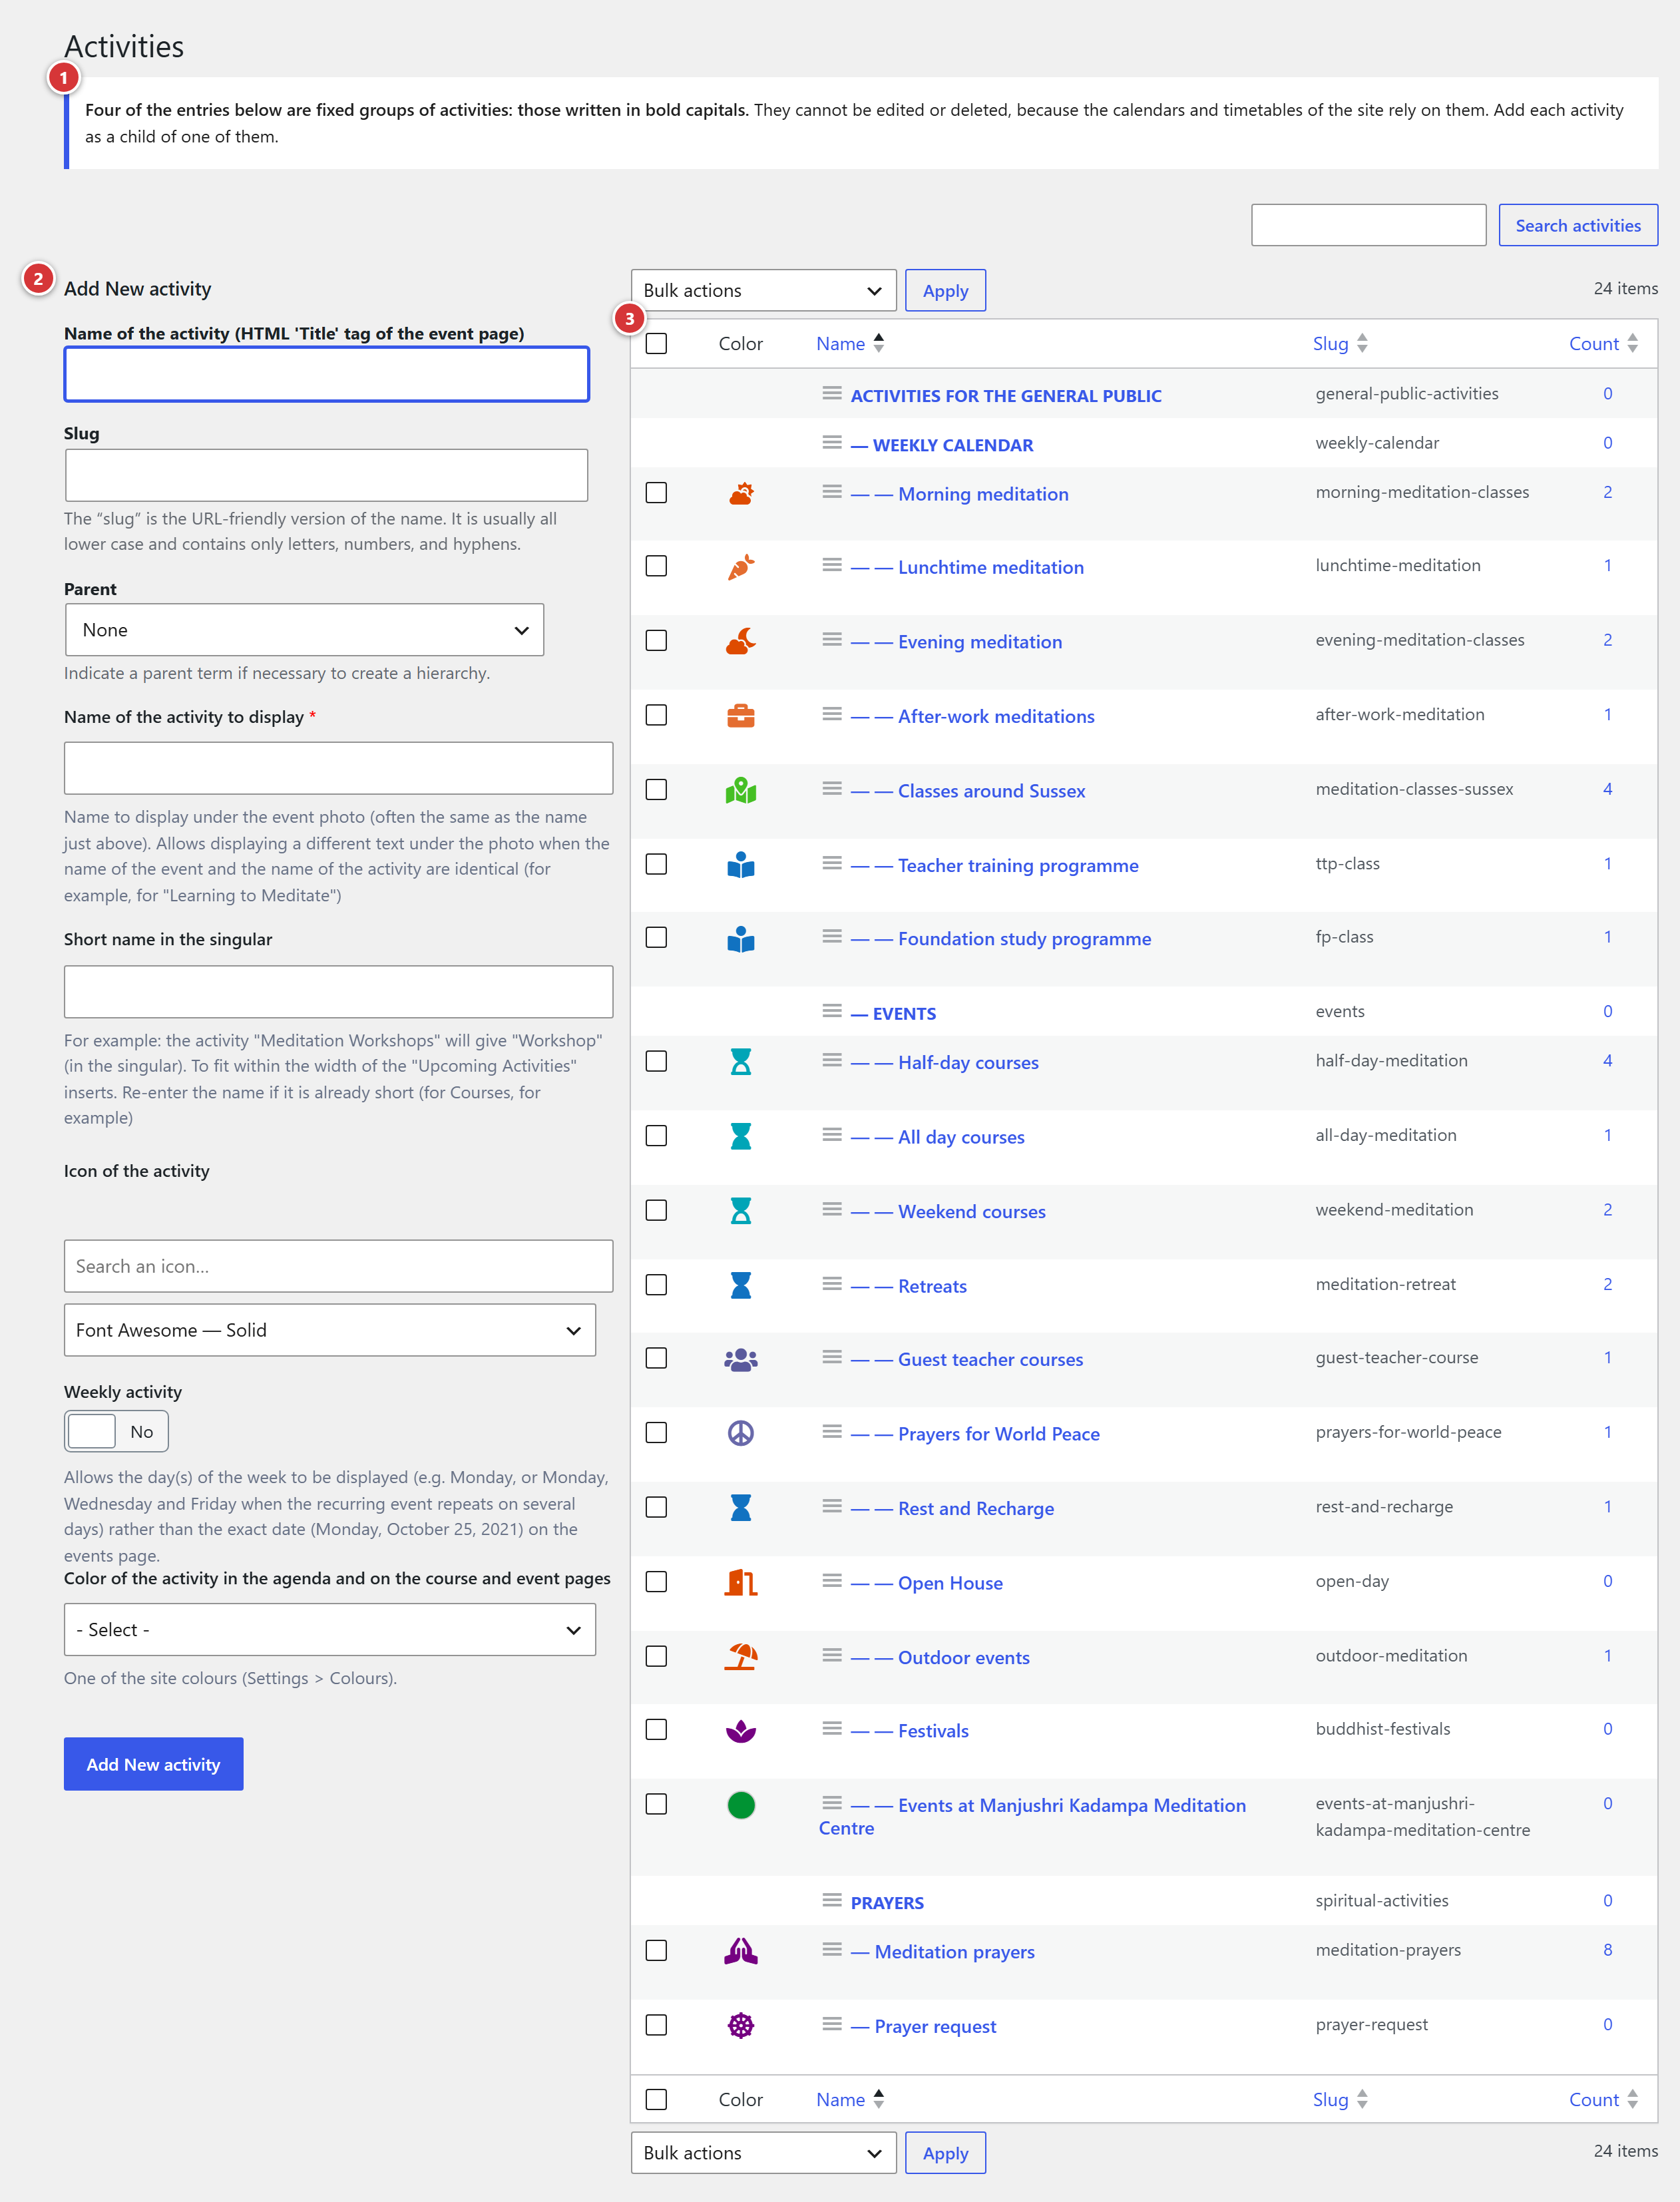
1 Box that reminds you of the fixed groups (see The four fixed groups). 2 Add form: the name, then the fields specific to the activity. 3 List of existing activities.
Activities
Where: Activities menu.
An activity is a type of event: "Classes", "Retreats", "Prayers"… Each event belongs to only one activity. On the site, the activity gives it:
- its colour in the calendar and on the class and event pages;
- its icon and its short name in the "Upcoming" blocks;
- the name displayed below the event's photo.
The four fixed groups
At the top of the list, four entries are not activities but groups of activities, created by the plugin. Like the groups of venues, you recognise them by their name in capitals and bold, with no tick box. They can be neither edited nor deleted, because the site's calendars and timetables rely on them.
- Activities for the general public brings together two groups:
- Weekly calendar: the classes that come back every week. These are the activities that appear in the weekly class timetable;
- Events: one-off events (half-days, days, weekends, retreats, festivals…).
- Prayers: the prayer sessions.
This separation lets the site present separate calendars, each readable at a glance. For example, the page presenting the calendars can offer:
- a general public calendar for the centre;
- a general public calendar for the other venues;
- a prayer calendar;
- a last calendar that brings all the activities together, for visitors who want a complete view.
So you do not force an indigestible calendar on your visitors: everyone goes straight to what interests them, and those who wish can still see everything.
Here are these four calendars on the demonstration site, each with its own tab:
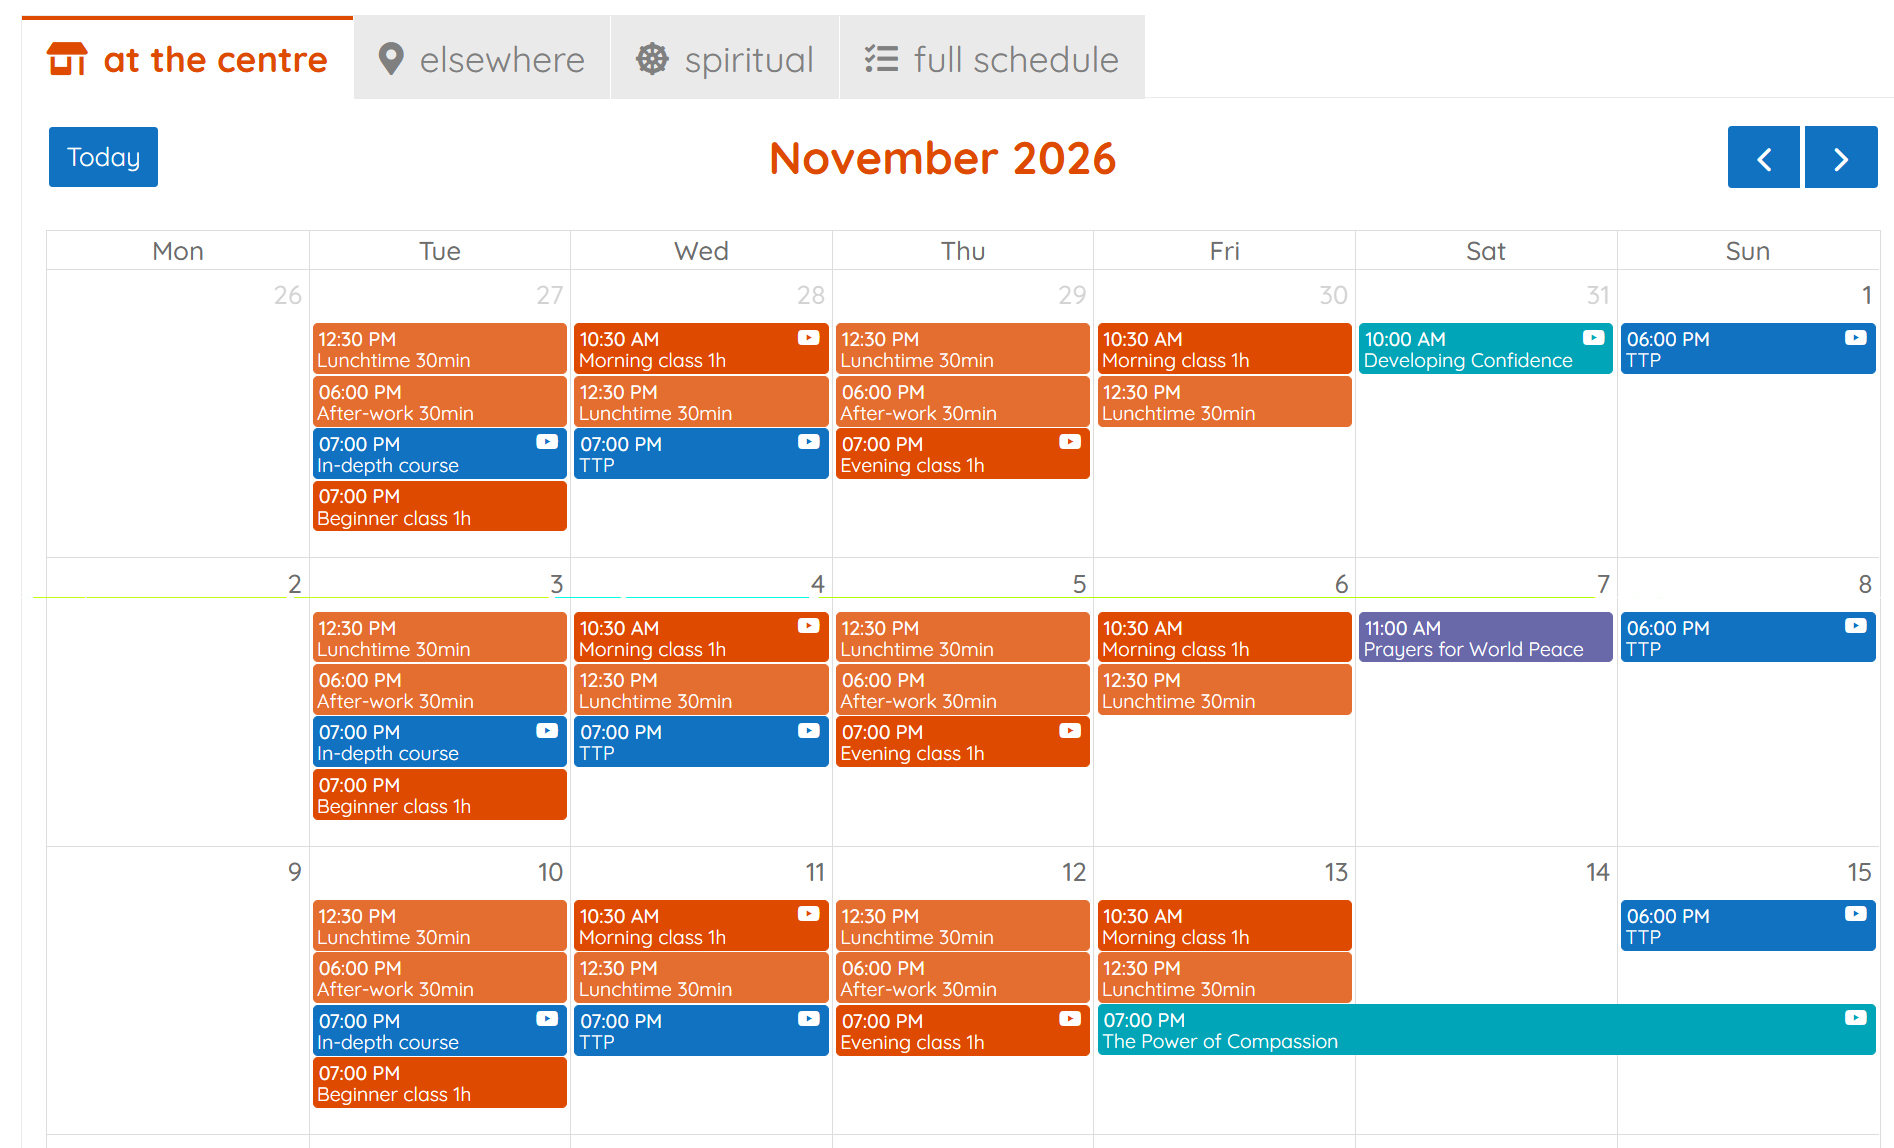
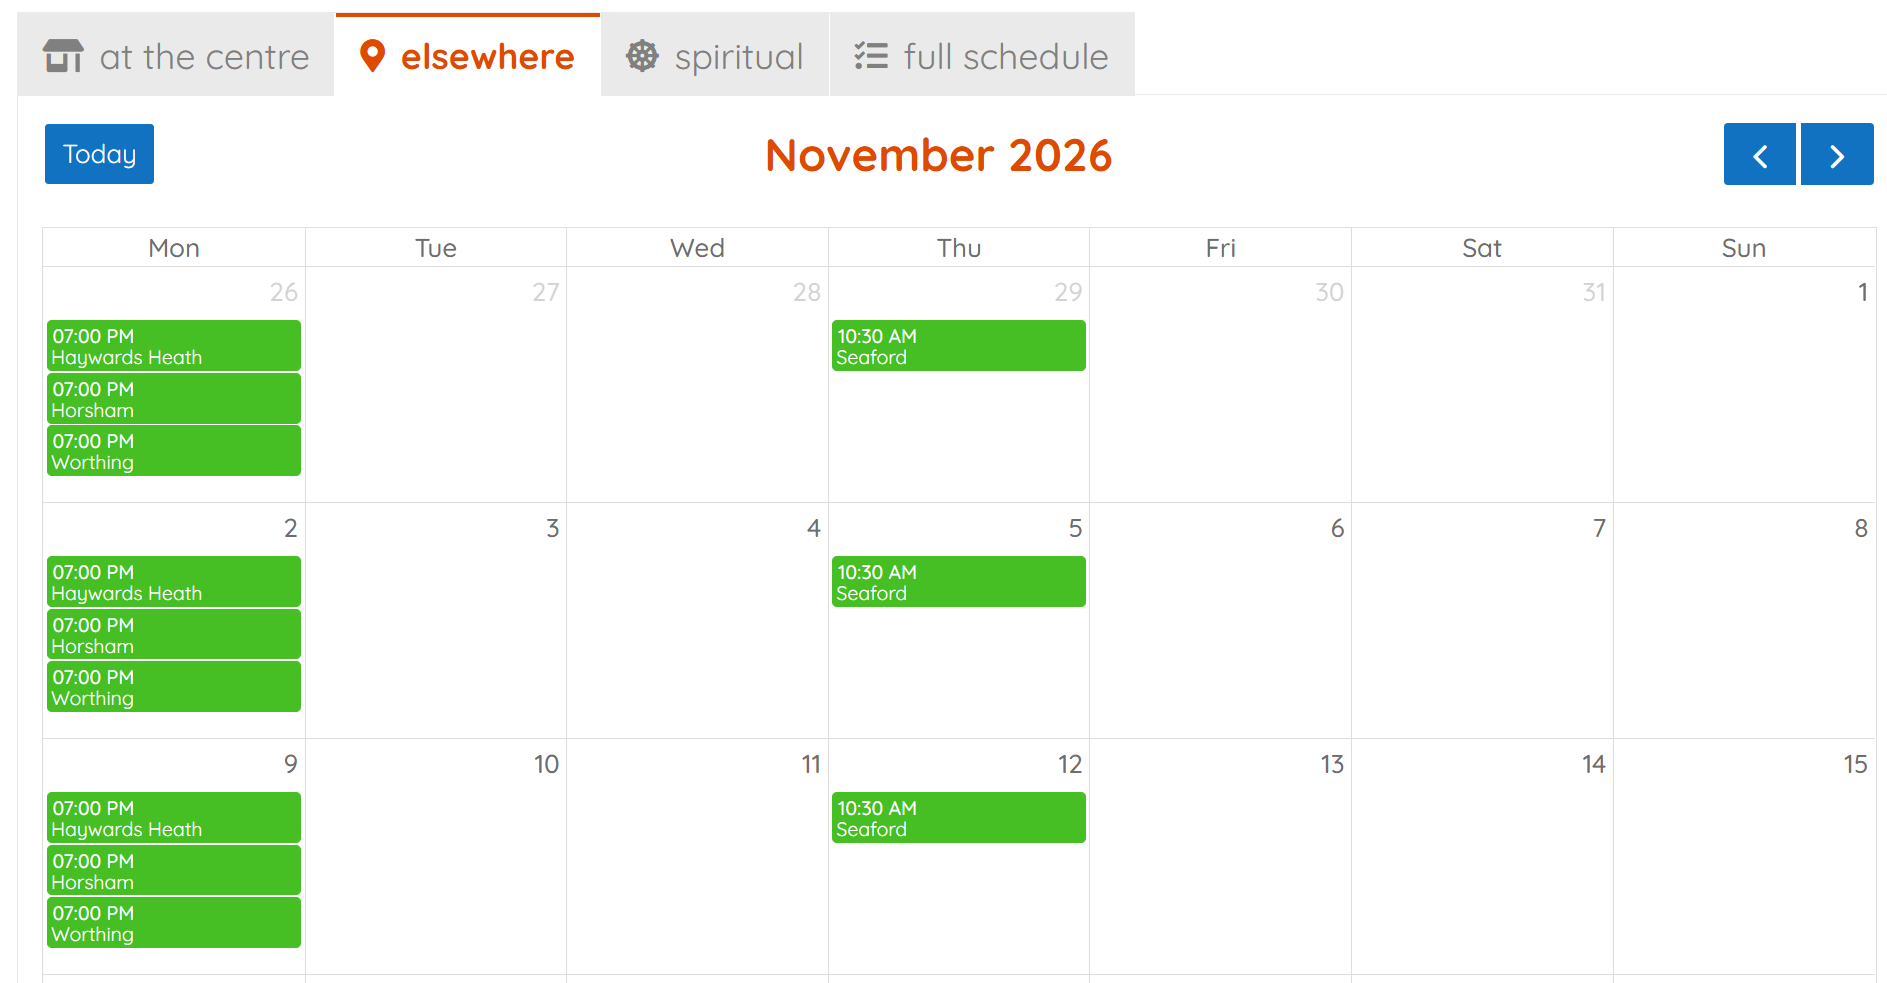
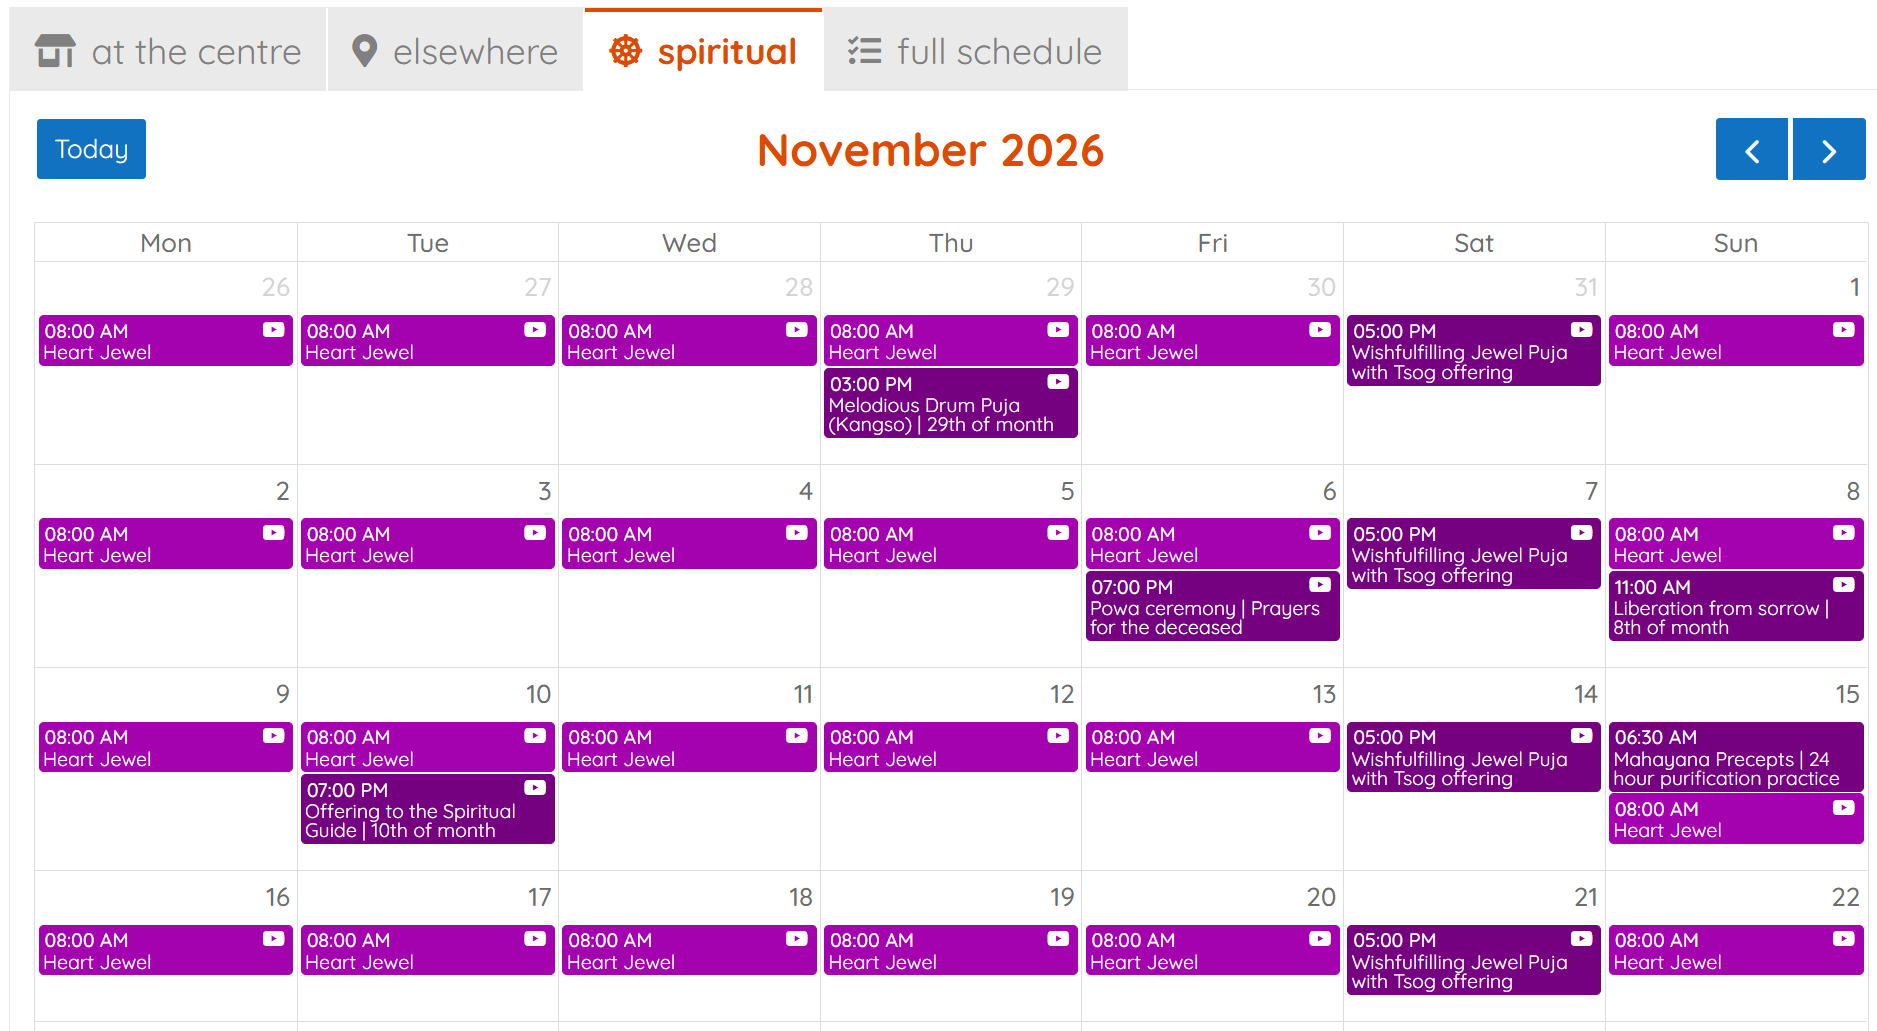
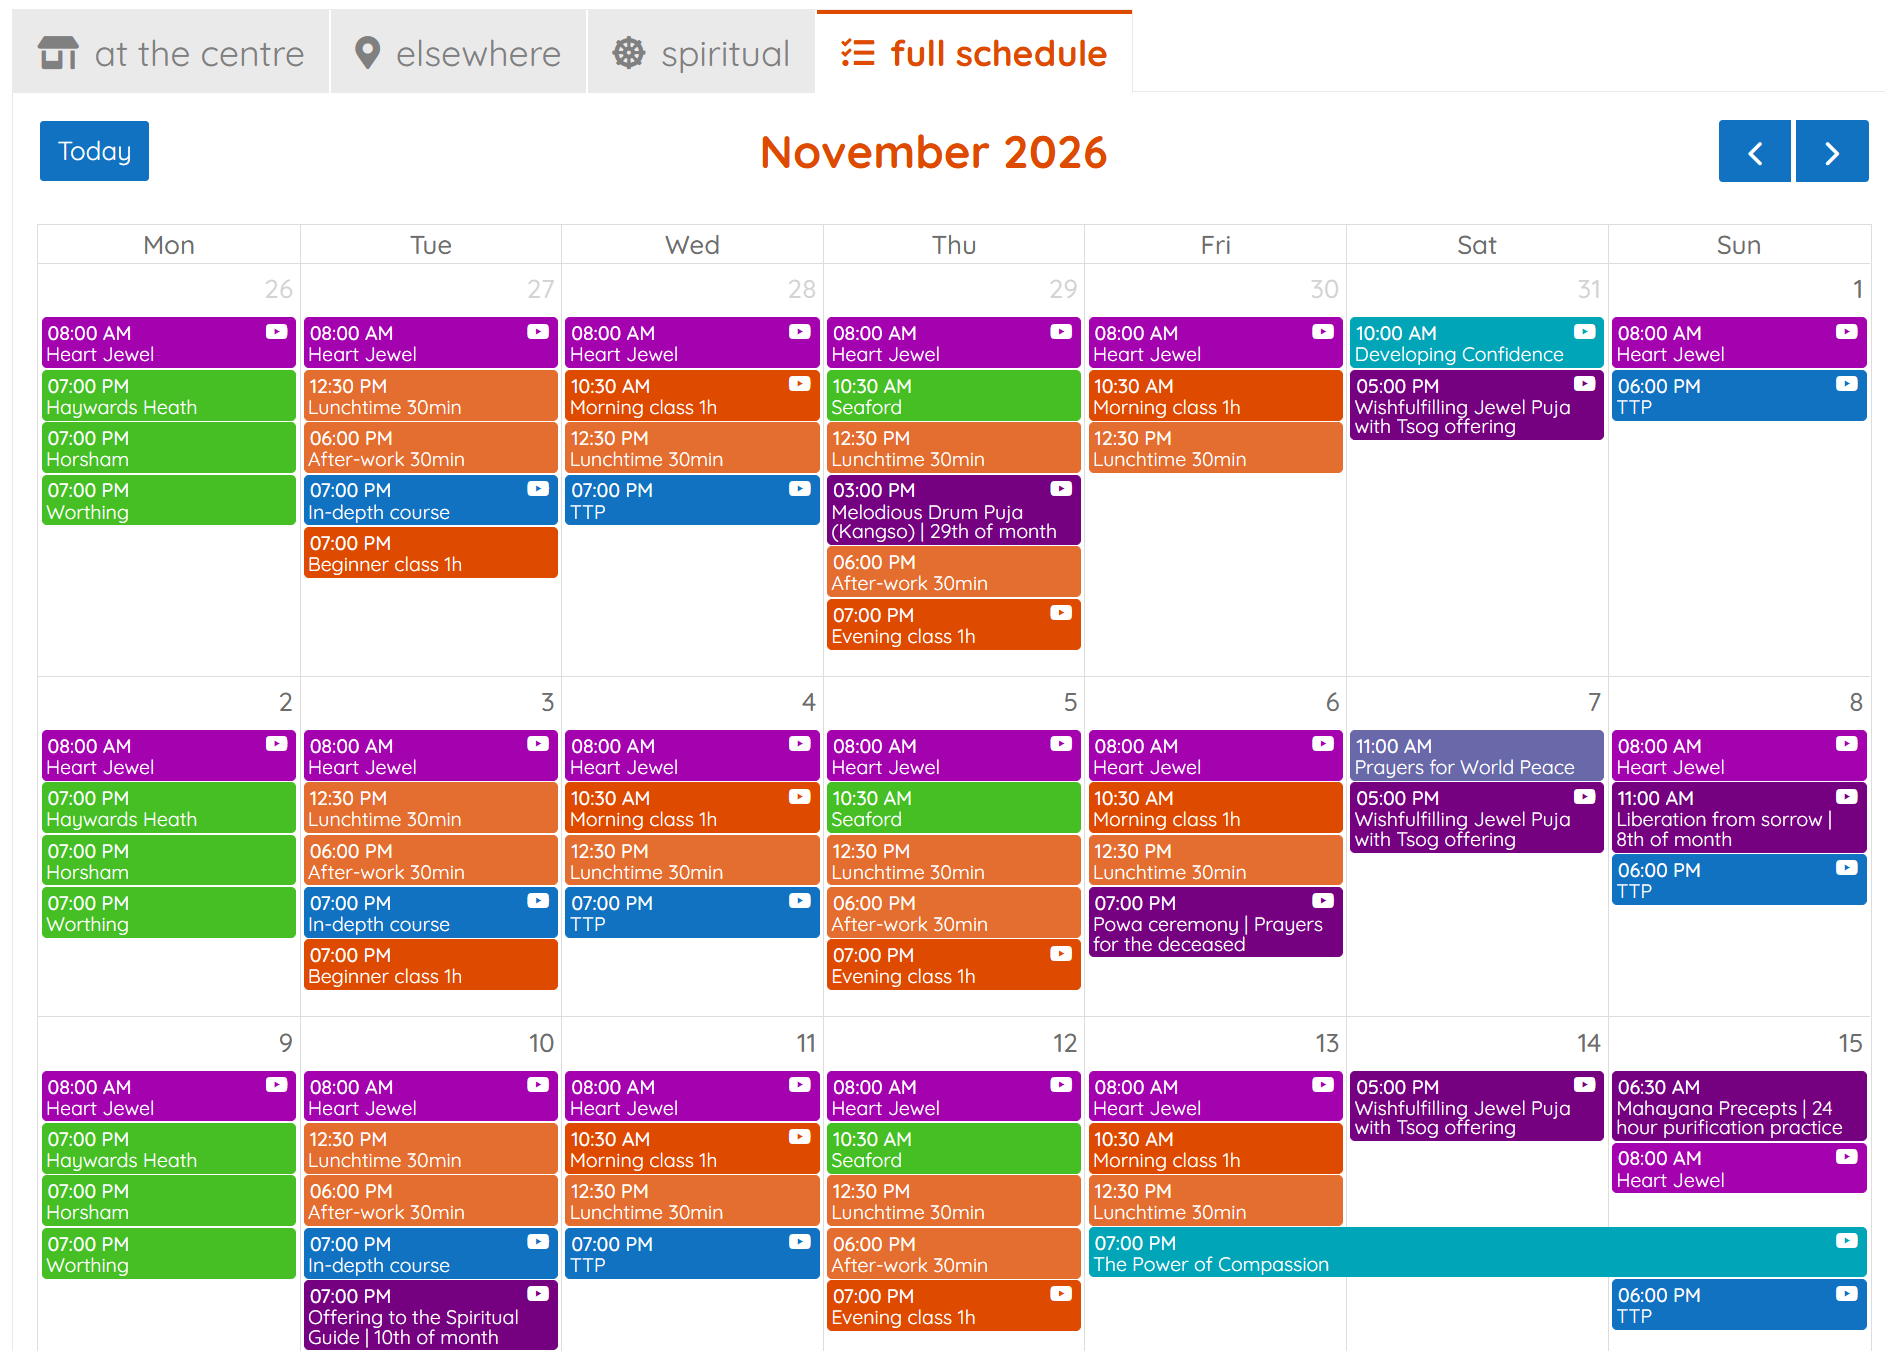
What decides which calendar an event goes in?
Two things, one after the other:
- Its activity does the first sorting: a prayer goes in the prayer calendar, a class or an event in the general public calendar.
- Its venue then splits the general public in two: the events at the centre (and those online) on one side, those at the other venues on the other (see The two groups of venues).
So a meditation class given in Seaford is still a general public class, but it appears in Other venues, not in At the centre.
This level of separation is not always needed. A small centre, with no branch and few activities, can do without it. It becomes very useful in a larger centre that offers varied activities or several venues.
The group names follow the language of the site: on an English site, they are Activities for the general public, Weekly calendar, Events and Prayers, as on the screenshot.
Always put an activity in a group
Each new activity goes under Weekly calendar, Events or Prayers: choose the group in the Parent list of the form. This is what makes its events appear in the right place on the site. Never leave Parent set to None, and do not put an activity directly under Activities for the general public.
Read the list at a glance
The list of activities shows the centre's whole tree, with the colour and icon of each activity. It lets you check at a glance:
- that each activity is in the right group: weekly classes under Weekly calendar, one-off events under Events, prayers under Prayers;
- that colours and icons stay consistent from one activity to another.
In the example, the colours go by families, and a shade shows the length:
- orange for meditation classes: light orange for half-hour sessions ("Lunchtime meditation"), deeper orange for one-hour sessions ("Morning meditation");
- blue for events: light blue for the shorter ones (half-days, days, weekends), darker blue for the longer ones ("Retreats");
- purple for prayers.
In the calendar, the meditation classes all stay in the oranges, but you can tell the short sessions from the others at a glance.
The edit screen of an activity
Each field of the edit screen controls a precise place on the site. Filled in well once, they set the appearance of all the activity's events: you will not have to think about it again when creating each event.
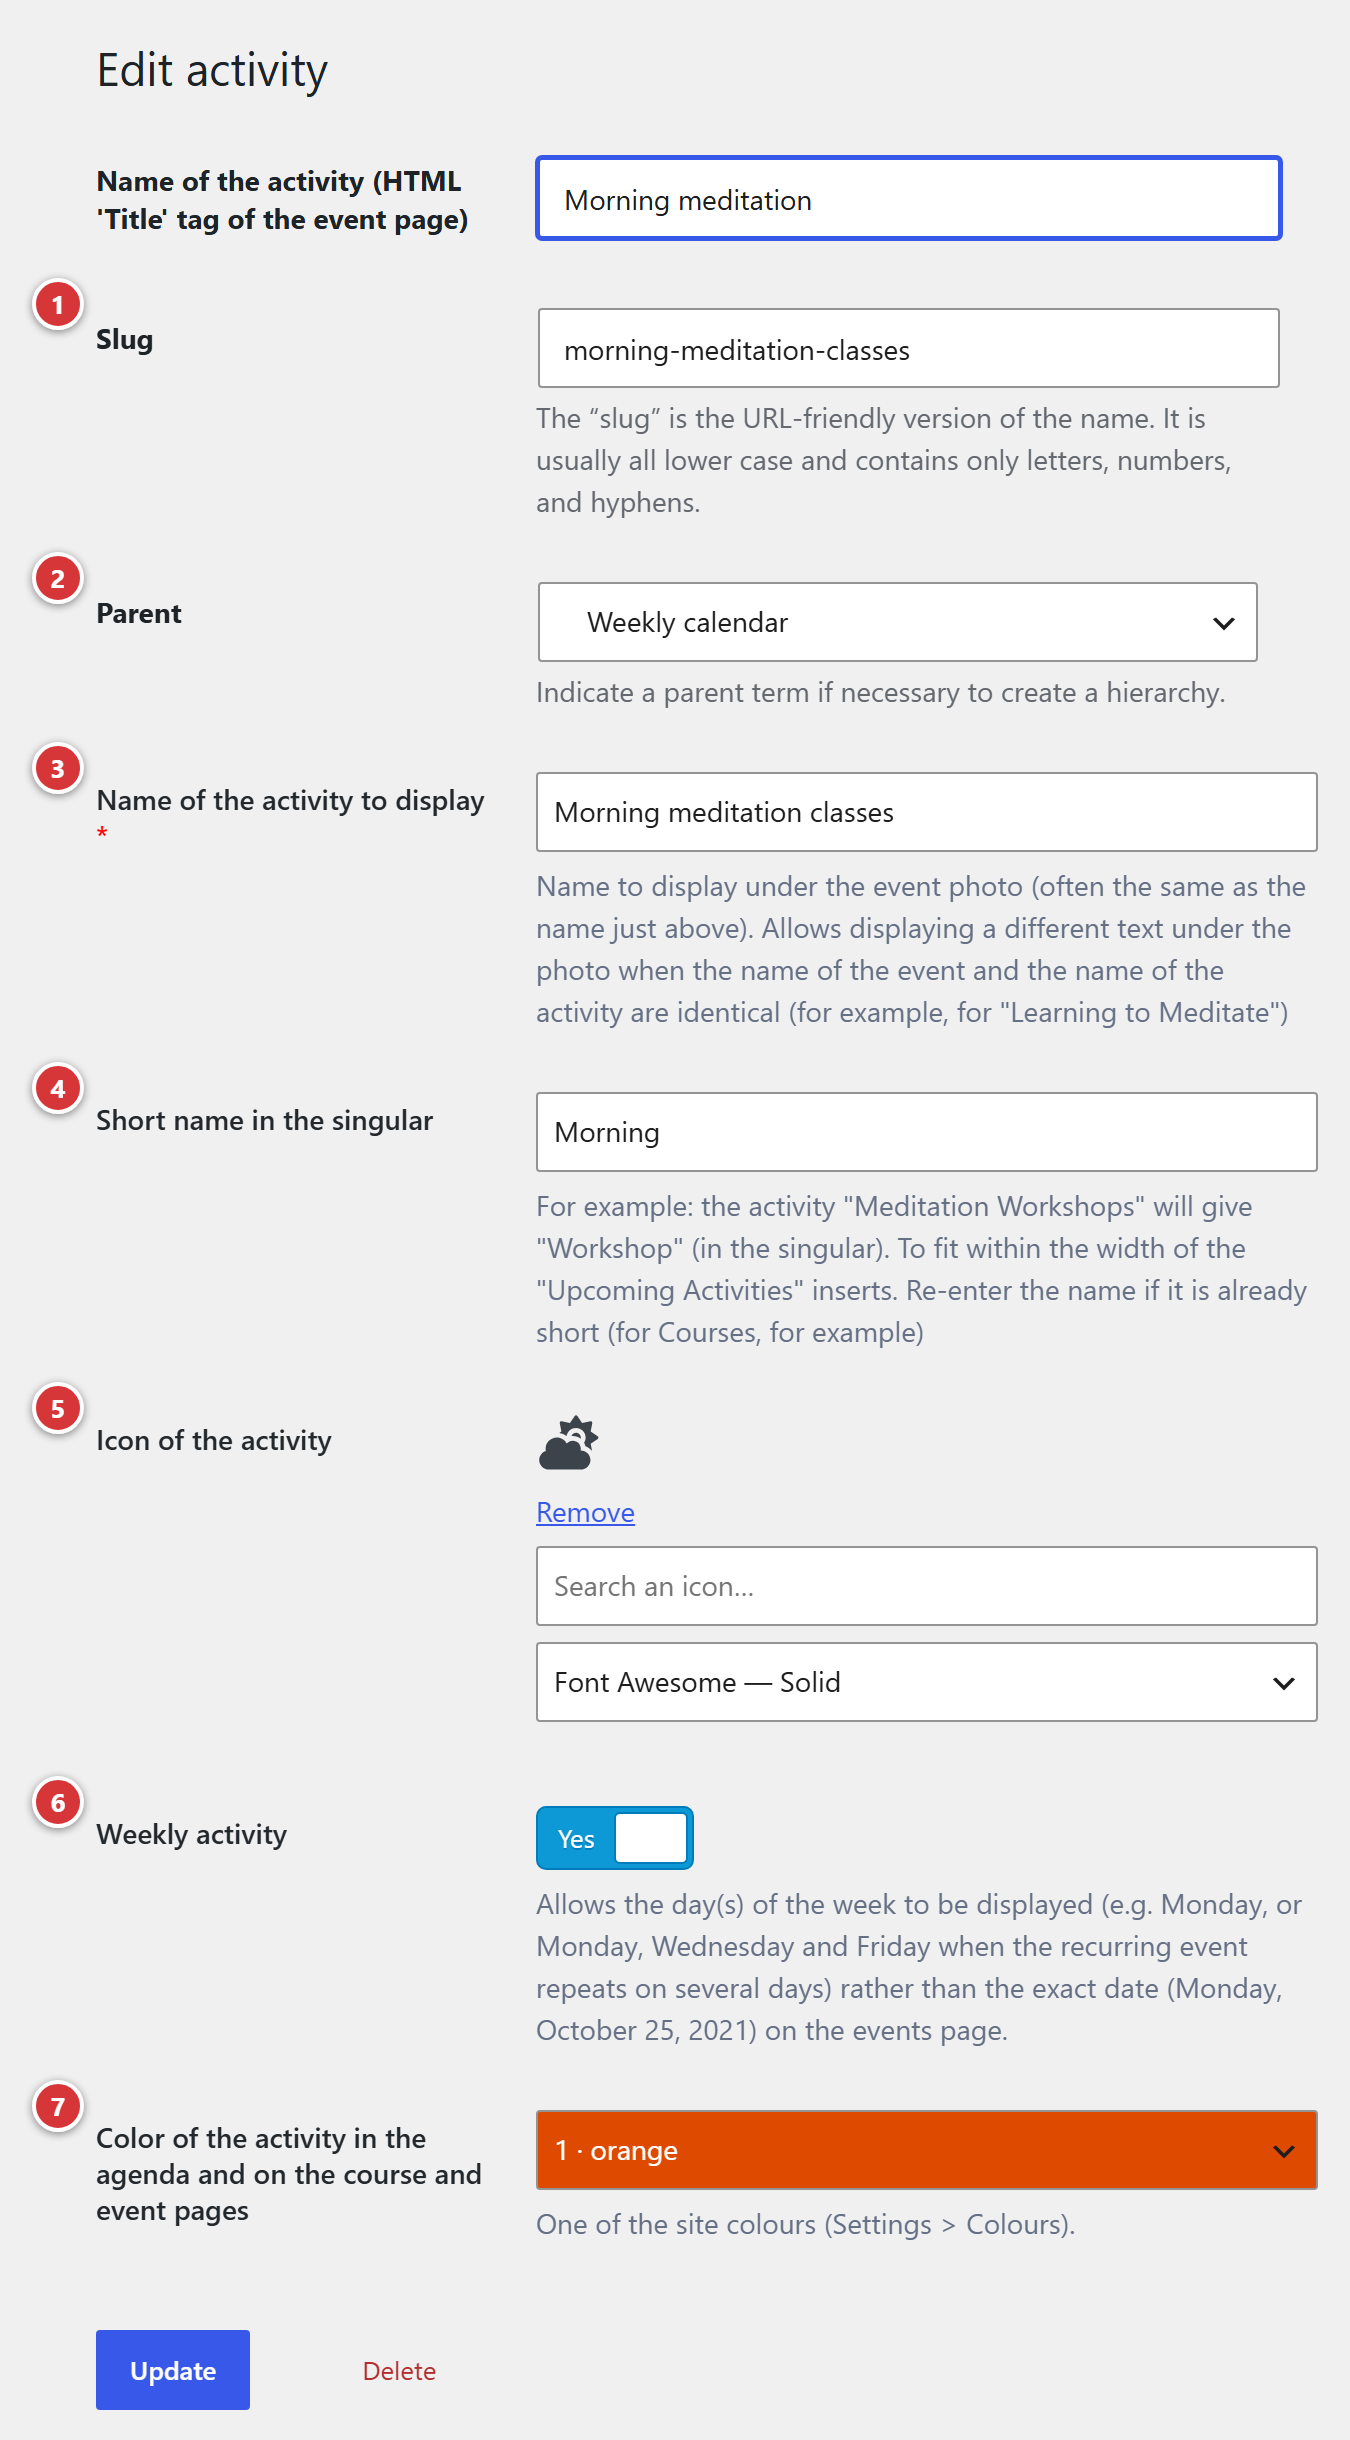
1 Slug: the technical identifier, created by WordPress. 2 Parent: the group, and therefore the calendar where the events appear. 3 Name of the activity to display: the start of the introduction, on the event page. 4 Short name in the singular: the label of the "Upcoming" cards. 5 Icon of the activity: the small picture that goes with the short name. 6 Weekly activity: the days of the week rather than a date. 7 Color of the activity in the agenda and on the course and event pages: the colour of all its events.
Name of the activity
The first field, Name of the activity (HTML 'Title' tag of the event page), is the reference name of the activity. It is the one you find in the list of activities and in the Activity list on the edit screen of each event. As its label says, it also goes into the page title of the event: the text of the browser tab, and the one shown by Google and other search engines.
So choose a name that speaks to a visitor who does not know the centre yet: "Morning meditation" rather than an internal abbreviation.
Slug
The "normalised" version of the name for web addresses: lower case, no accents or spaces.
WordPress creates it by itself when the name is first entered: you have nothing to write there. It
does not need to follow the name: on the screenshot, the activity "Morning meditation" has kept
the slug morning-meditation-classes, with no visible consequence.
Leave the slug of an activity in use alone
The site's calendars can refer to an activity by its slug: changing it afterwards can make its events disappear from a calendar. Renaming the activity, on the other hand, causes no problem: the slug does not follow the new name.
Parent
The group the activity belongs to: Weekly calendar, Events or Prayers (see The four fixed groups).
This is the field with the most consequences: it decides which calendar the activity's events appear in, and whether it is listed in the weekly class timetable. Changing the parent moves all its events, past and upcoming, from one calendar to another in one go.
Name of the activity to display
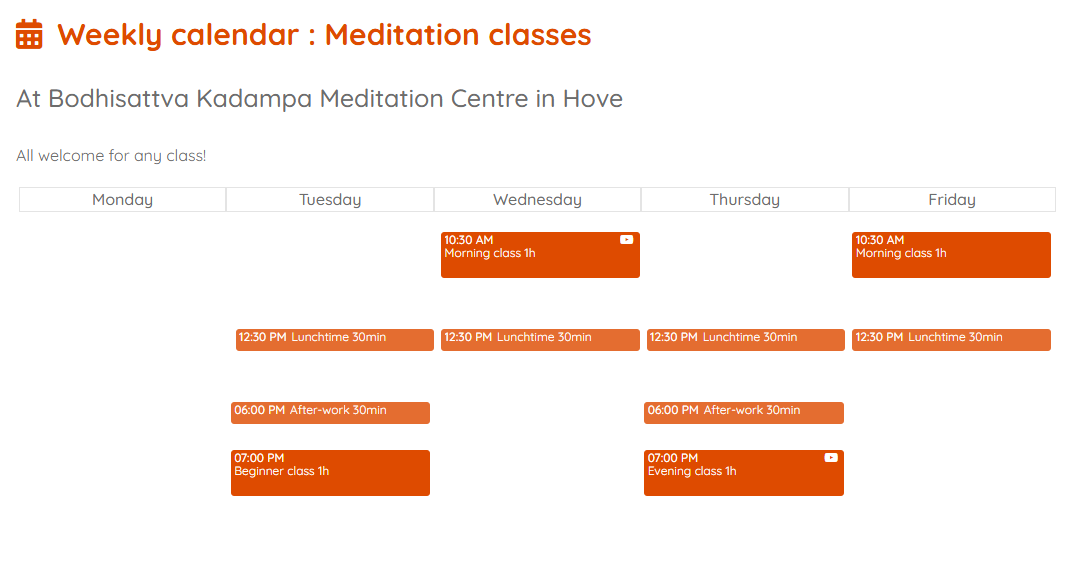
Required field (red asterisk). Below the image on the event page, the site writes a line of introduction by itself: this name, followed by the venue. For example "Lunchtime meditation at Bodhisattva KMC" (see it on the page, line 1).
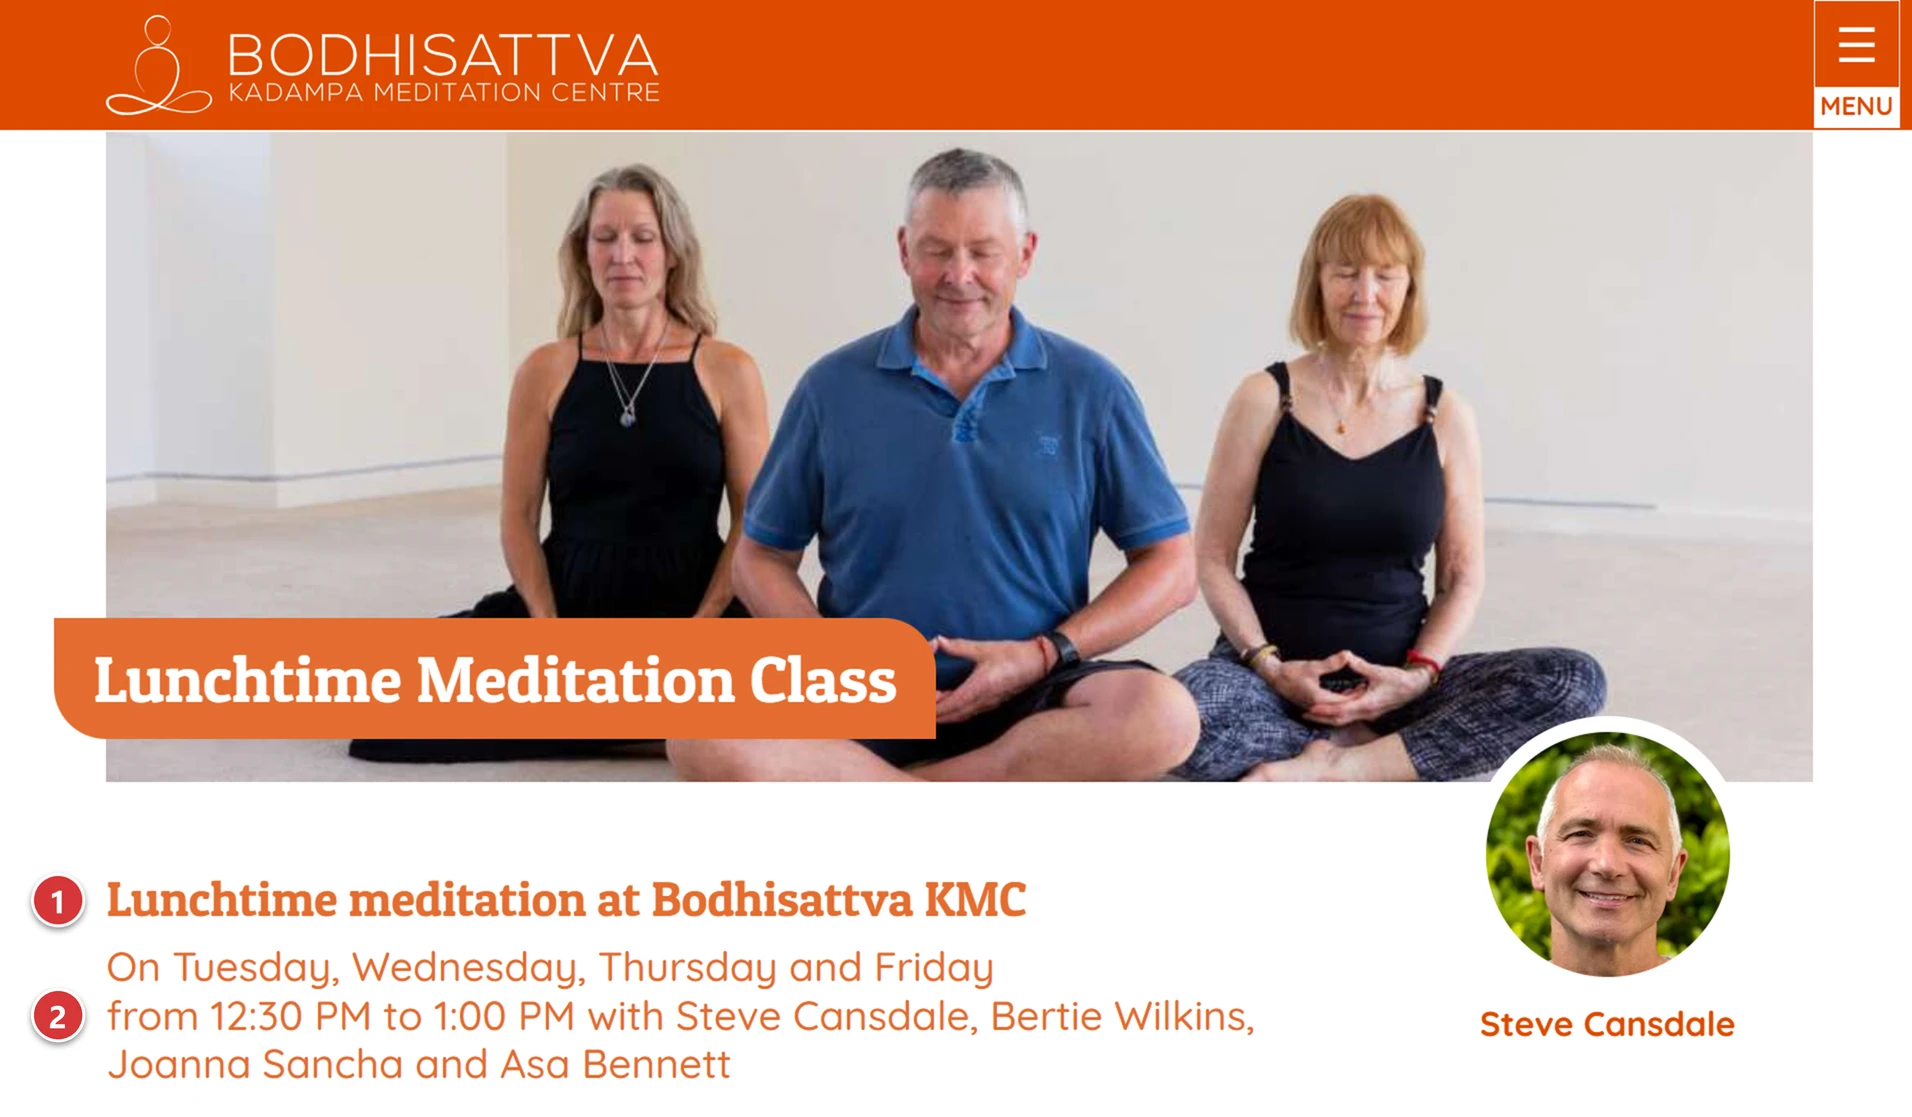
The same name comes back, in lower case, in the middle of other sentences on the site: the title of the registration window and the link to a linked event ("…: retreat on the same theme"). So write it like a common noun that reads well in a sentence ("Meditation class", "Retreat"), not like a title.
On the example page, the event title, "Lunchtime Meditation Class", is written on the photo. Just below, the introduction line begins with the display name of its activity, "Lunchtime meditation", followed by the venue. The two texts are similar without repeating each other: the title names the event, the introduction says what type of activity it is and where it is held. If the display name had been identical to the title, the page would have said the same thing twice in a row. So choose a display name that complements the titles of the activity's events instead of repeating them.
Short name in the singular
The label at the top of the cards in the "Upcoming" blocks (Events presentation), preceded by the icon: "HALF-DAY", "WEEKEND", "WORLD PEACE"… (see the cards). The site writes it in capitals.
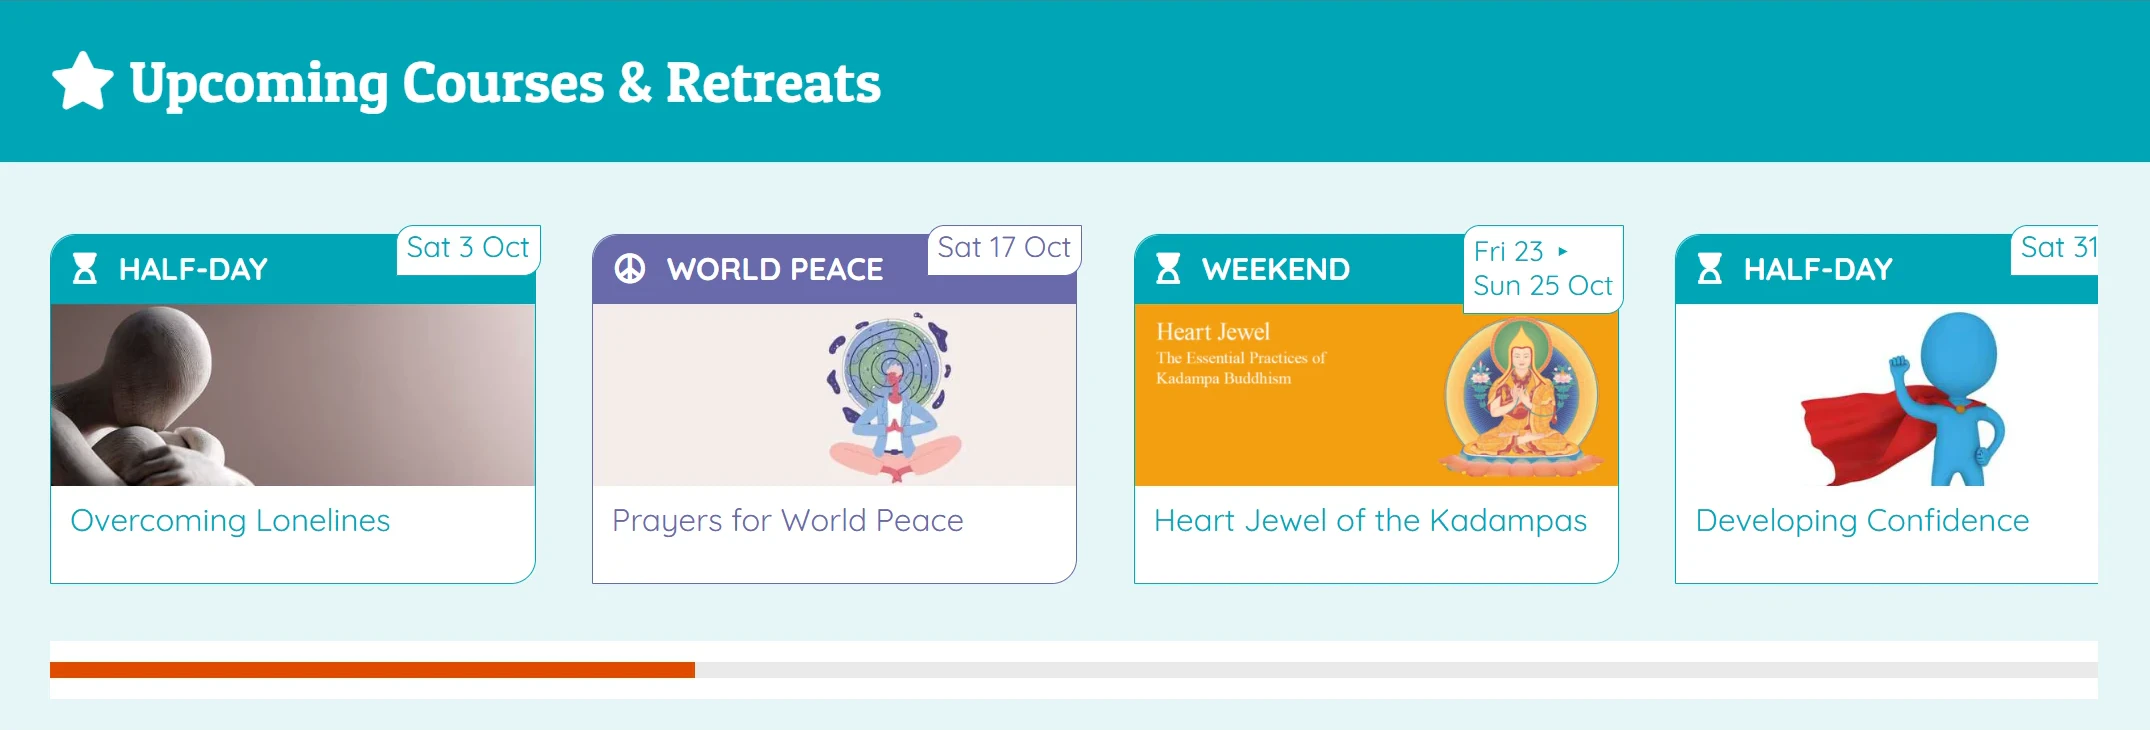
- In the singular, because each card presents one event: the activity "Meditation workshops" gives "Workshop".
- Short, because the label shares the top of the card with the date: one or two words.
- Always filled in: if the activity's name is already short ("Classes"), enter it again. Left empty, the label shows only the icon.
Icon of the activity
The small picture before the short name on the "Upcoming" cards, which also marks each session in the Calendar by day presentation. It also appears in the list of activities in the administration, which helps you find your way.
To choose it:
- In the list of libraries, preferably keep Font Awesome — Solid: all the icons on the site will have the same style.
- Type a word in English in Search an icon…:
sun,moon,hourglass,heart… - Click the icon you want: it appears at the top of the field, above the Remove link.
Remove takes the icon away. Think in families of activities: in the example, all the one-off event activities (half-days, weekends) share the same hourglass, and only their short name tells them apart.
Weekly activity
Set it to Yes for an activity that comes back every week. On the event page, the second line of the introduction then gives the days of the week instead of a date: "On Tuesday, Wednesday, Thursday and Friday from 12:30 PM to 1:00 PM" (see it on the page, line 2), rather than "Monday 25 October 2021".
Why? A weekly class stays the same all year round: its page should say "every Tuesday", not just the date of the next session. Conversely, leave this setting off for one-off events: a retreat must announce its exact dates.
In practice, activities under Weekly calendar are almost always weekly, those under Events are not.
Colour
The Color of the activity in the agenda and on the course and event pages field gives its colour to all the activity's events: their box in the calendar, the top of their "Upcoming" cards, the introduction on their page.
It offers the colours of the site's colour scheme, each with its number and name (for example
1 · orange), and takes on the chosen colour so that you see it straight away. You never enter a
colour freely.
Edit or delete an activity
- Changing the name or colour of an activity affects all its events, in the calendar as in the "Upcoming" blocks.
- Deleting an activity does not delete the events attached to it, but they no longer have an activity: they lose their colour and their icon. Before deleting, open the events concerned and put them in another activity.
Venues
Where: Venues menu.
A venue is the place where an event happens: the centre's hall, an outside venue, or online. The information entered here is shown on the page of each event (address, access, map). You enter it only once, however many events are held there.
The two groups: Main calendar and Other venues calendar
At the top of the list of venues, two entries are not venues but groups of venues: Main calendar and Other venues calendar. The plugin creates them itself. You recognise them by their name in capitals and bold, and by the absence of a tick box. Each real venue goes under one of the two, as a child venue: this group decides which calendar on the site its events appear in.
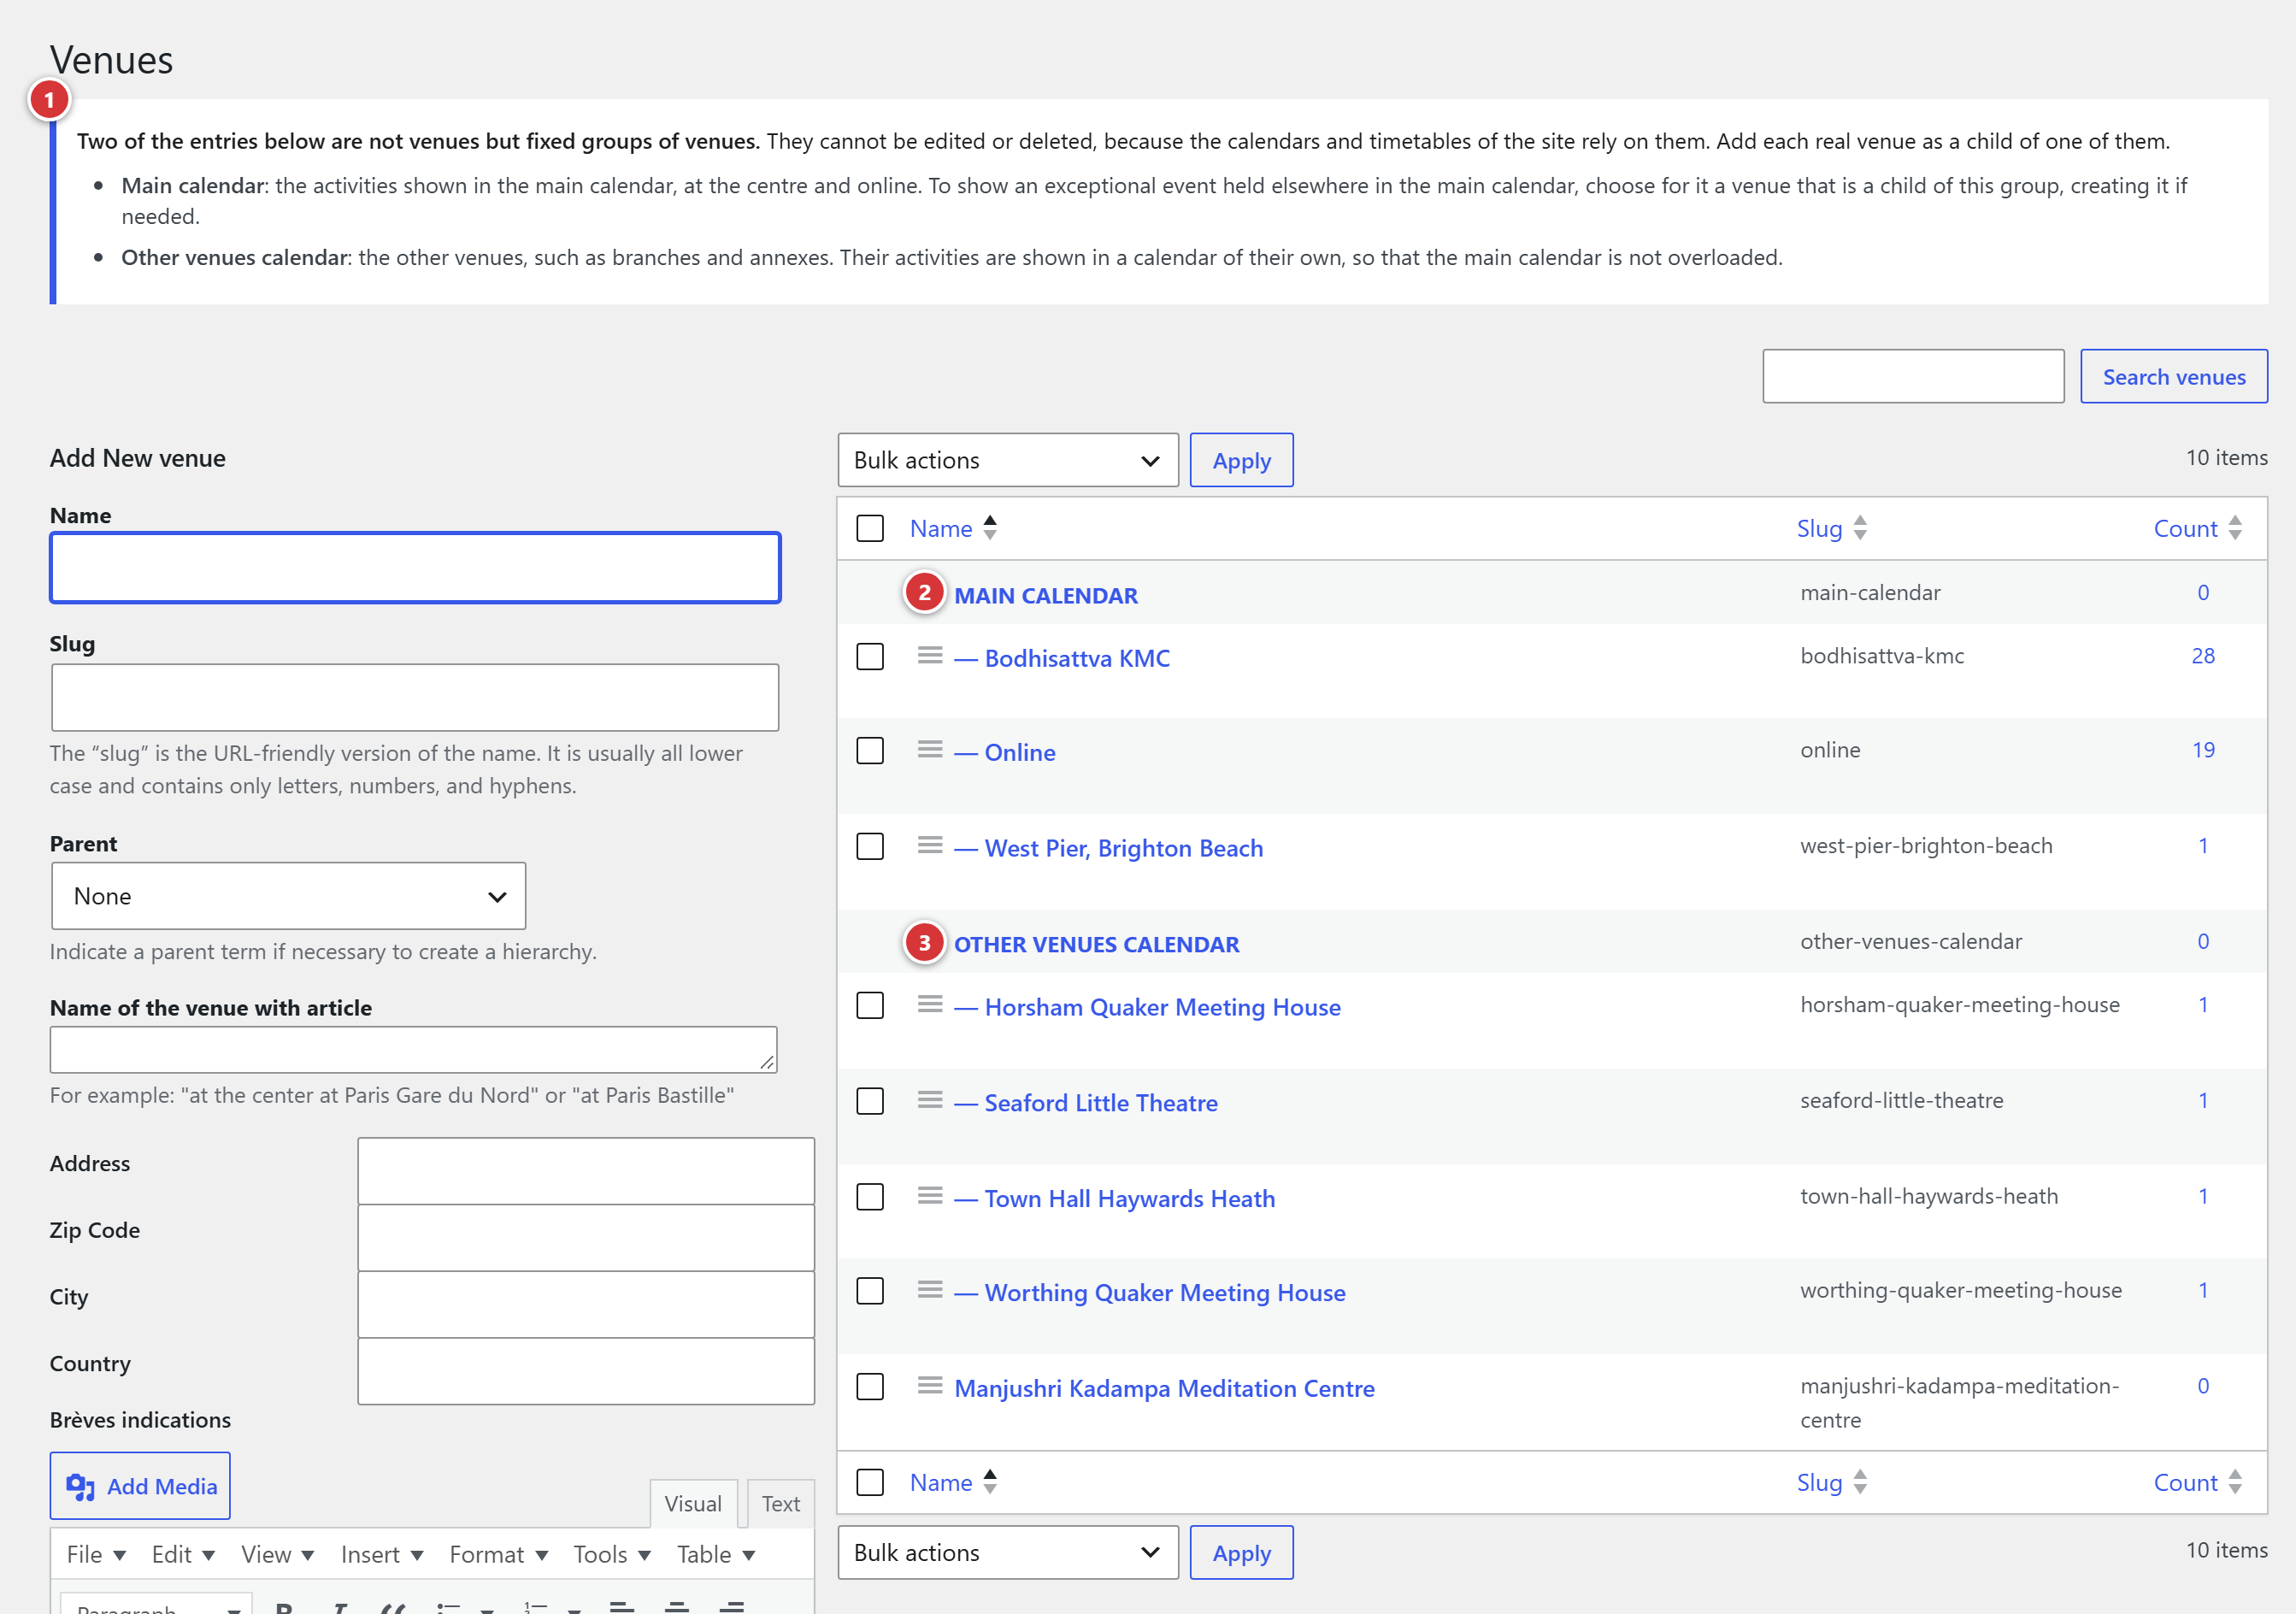
1 The box that reminds you of the role of the two groups, at the top of the screen. 2 Main calendar and its venues. 3 Other venues calendar and its venues.
- Main calendar groups the centre and the online venue. Their events appear in the site's main calendar, the one most visitors look at.
- Other venues calendar groups the branches and the halls where the centre gives regular classes outside its walls. Their events are presented in a separate calendar, so as not to overload the main calendar. This group is also the one used by the second table of the weekly timetable ("Other venues").
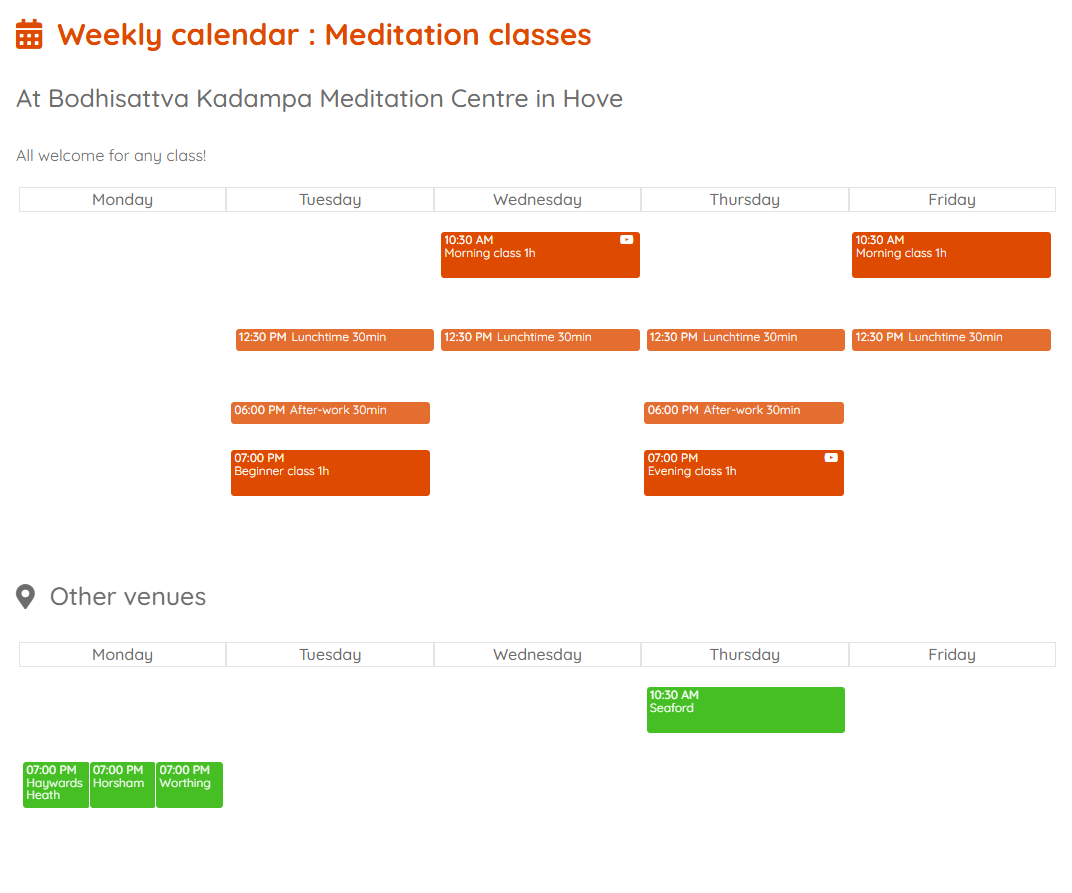
The group names follow the language of the site: on an English site, they are Main calendar and Other venues calendar, as on the screenshot.
An exceptional event elsewhere, in the main calendar
A one-off event held outside the centre (an outdoor meditation, a talk in a hired hall) can still appear in the main calendar: choose for it a venue under Main calendar, creating it if needed. On the screenshot, this is the case of "West Pier, Brighton Beach".
Adding a venue. In the add form, always choose one of the two groups in the Parent list. A venue left at None belongs to neither calendar: its events do not appear in them.
Neither editable nor deletable. The two groups have neither an Edit nor a Delete link, and their edit screen does not open: the site's calendars and timetables rely on them, and would stop working if one disappeared or changed. The venues under them can be edited freely.
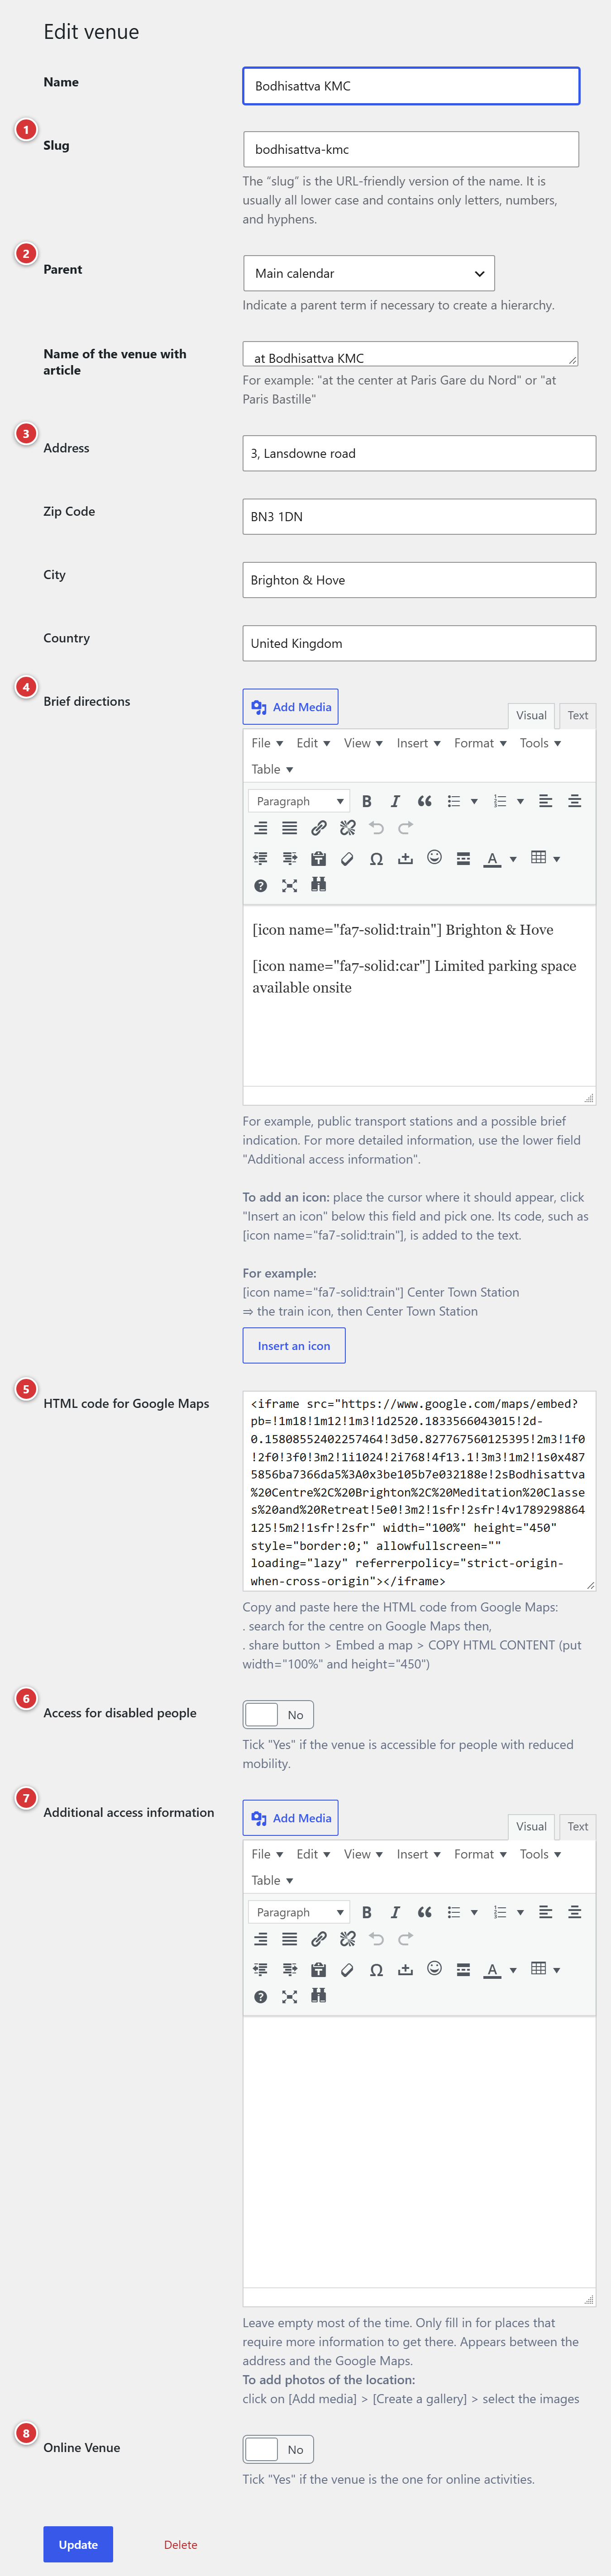
1 Slug. 2 Parent. 3 Address, Zip Code, City, Country. 4 Brief directions. 5 HTML code for Google Maps. 6 Access for disabled people. 7 Additional access information. 8 Online Venue.
Name
The name of the venue, as it will be shown on the event page.
Address, Zip Code, City, Country
The postal details. The event page shows the address, then the zip code and the city on the next line. The country is kept with the venue, without appearing on the page.
Brief directions
One or two lines to help people get there: the nearest station or bus stop, parking… They are shown in the address block on the event page (their exact place depends on the site's layout). For longer explanations, use the Additional access information field further down instead.
A small icon at the start of each line makes it readable at a glance: a train for the station, a car for the car park. To add one:
- Click in the text, where the icon should appear (usually at the start of the line).
- Click the Insert an icon button, below the field: the icon picker opens.
- Preferably keep the Font Awesome — Solid library, so that all the icons on the site have
the same style, and type a word in English in Search an icon…:
train,bus,car,bicycle,square-parking… - Click the icon you want. Its code is written into the text, where the cursor is.
In the field, you only see this code; the icon itself only appears on the site, at the size and in the colour of the text around it. The two lines of the venue edit screen above,
[icon name="fa7-solid:train"] Brighton & Hove
[icon name="fa7-solid:car"] Limited parking space available onsite
give, on the event page:
To change an icon, delete its code (everything between the square brackets, brackets included) and
insert another one. Older codes, without a library name (such as [icon name="train"]), still
work: there is no need to replace them.
HTML code for Google Maps
The map shown on the event page. To get it:
- Look up the centre on Google Maps.
- Click Share, then Embed a map.
- Click COPY HTML and paste the code into this field.
- In the pasted code, set the width to
width="100%"and the height toheight="450".
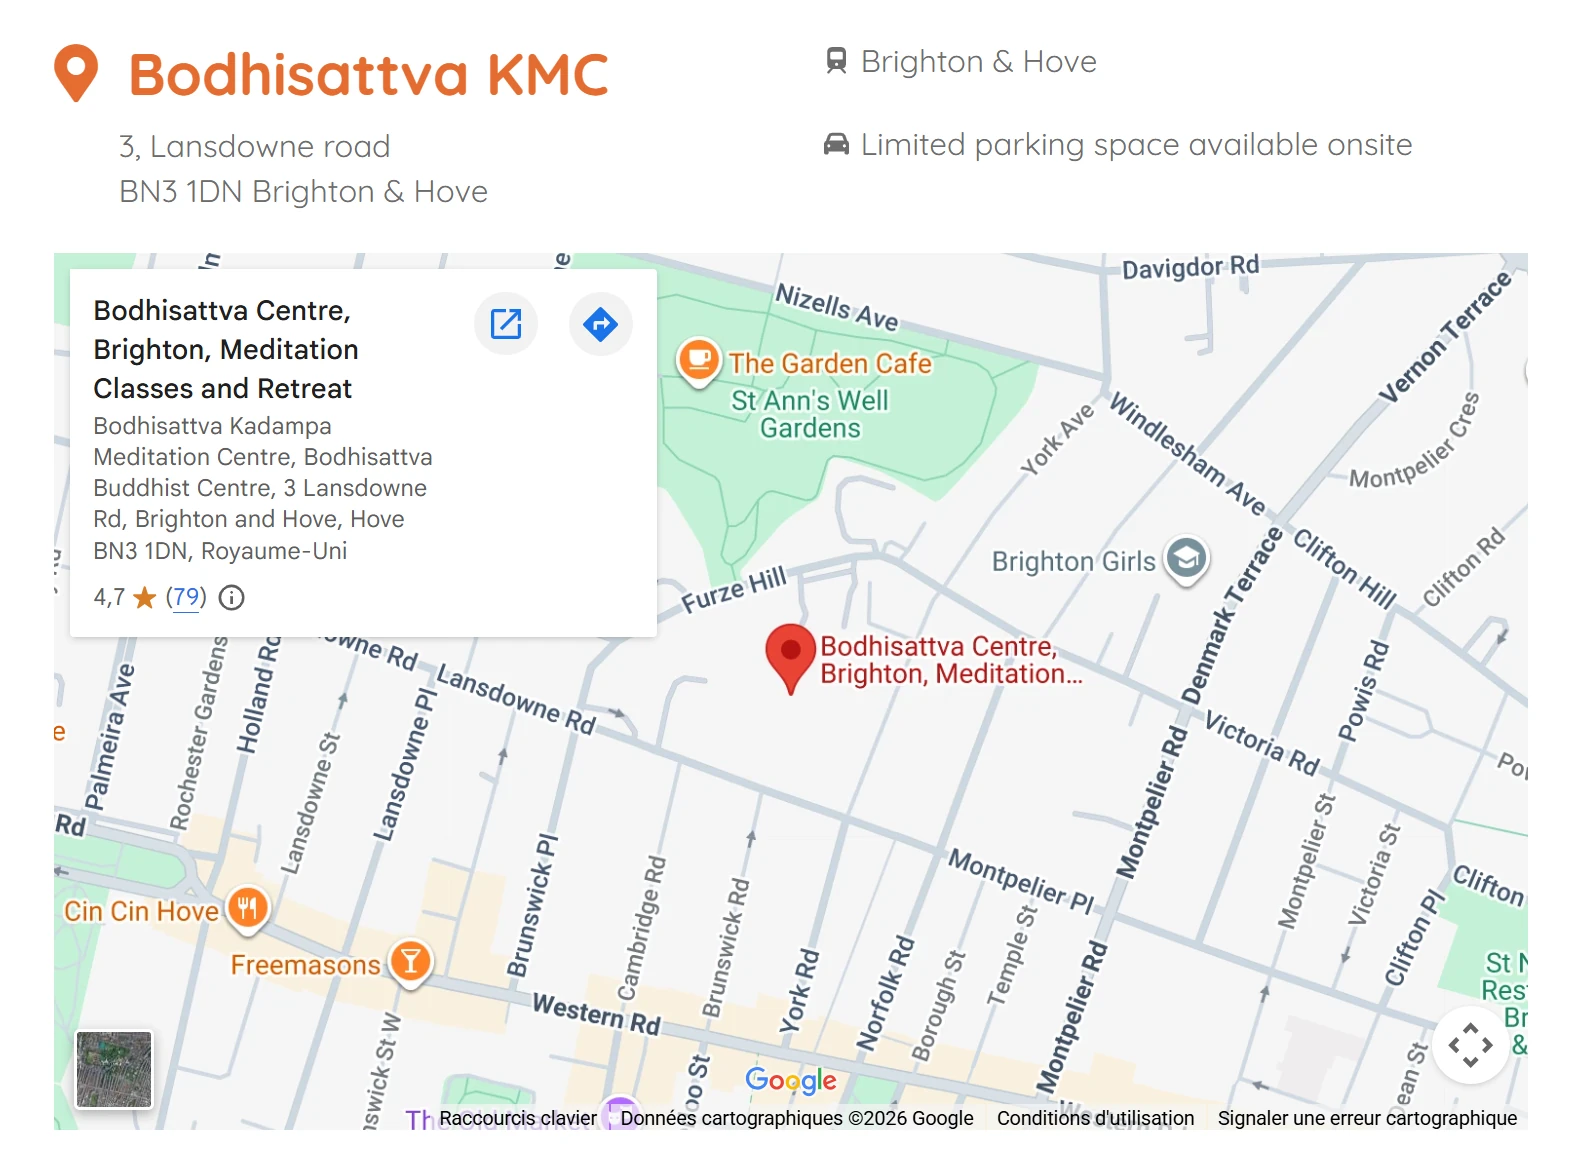
An example of the final result: the venue block as it appears on an event page, built from the information on the venue edit screen above (name, address, brief directions and Google Maps map).
Access for disabled people
Tick the box if the venue is accessible to people with reduced mobility. The event page then shows a wheelchair icon and the words "Accessible for people with reduced mobility".
Additional access information
An optional field, to be left empty most of the time: only fill it in for a venue that needs explanations on how to get there. The text is shown between the address and the map.
To add photos of the venue: click Add Media, then Create Gallery, and select the images.
Online Venue
Tick the box for the venue that stands for online activities. An event attached to this venue shows neither address nor map, but its online arrangements.
Only one online venue
Tick this box for one venue only, the one you will choose for all online events. Do not tick it for a physical venue: the address and the map would no longer appear on its events.
Edit or delete a venue
Editing a venue updates the page of all the events held there. Deleting a venue does not delete the events, but they no longer have an address: move them to another venue first.
Order of the lists
In the drop-down lists and on the site, activities, teachers and venues are presented in the order chosen by the webmaster, not in alphabetical order: the manual order is set by drag and drop in the list. It must first have been switched on in Settings > Advanced, Manual order section; see Advanced.