Events
Where: Events menu. Who: editors and administrators.
This is where you create and edit the centre's events: classes, retreats, workshops, evenings… Each event has its own page on the site, and appears in the public calendar and in the "Upcoming" blocks. This page describes the two screens you need to know: the list of events, then the screen for editing an event.
For the overall logic (event, activity, session), see Events, activities and sessions.
The list of events
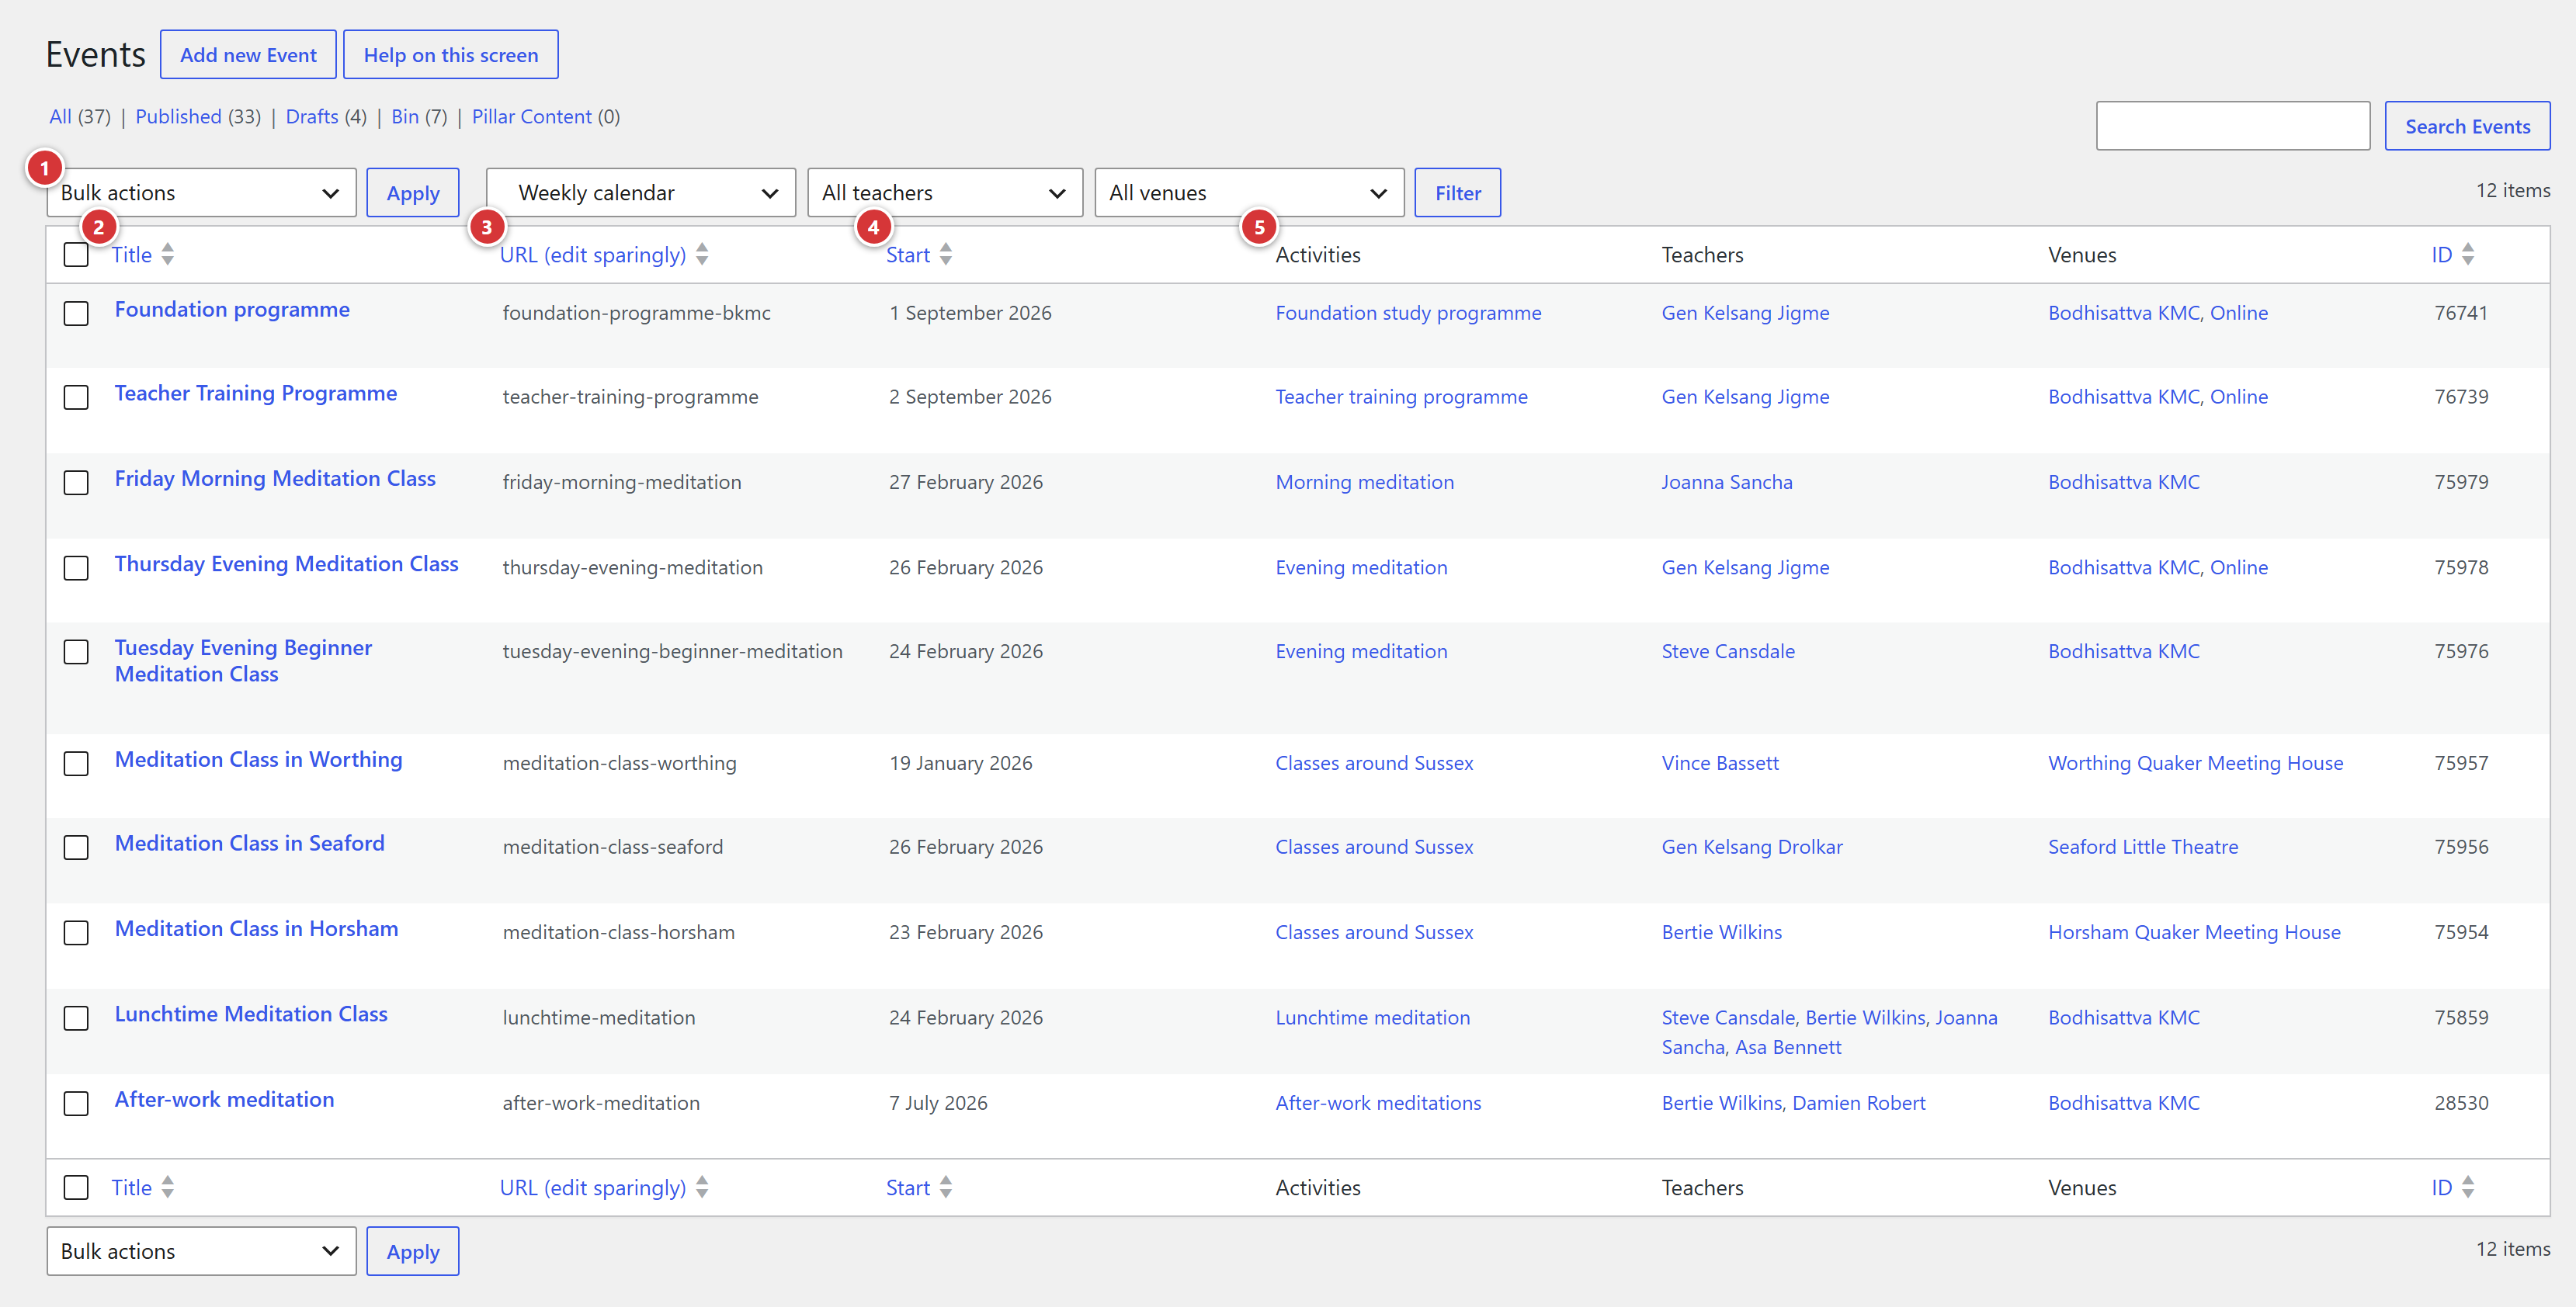
1 Filters by activity, teacher and venue. 2 Title of the event. 3 URL of the event page. 4 Start: first date of the event. 5 Associated Activities, Teachers and Venues.
For each event, the list shows:
| Column | Content |
|---|---|
| Title | The title of the event. Click it to edit the event. |
| URL (edit sparingly) | The address of its page on the site. |
| Start | The date of the first session. |
| Activities, Teachers, Venues | What was chosen in the event. |
| ID | The event's internal number. Only the webmaster needs it. |
Do not change the URL lightly
The URL is the address that visitors and search engines know. Changing it breaks existing links (pages, emails, social media). Only do it if it is really necessary.
A URL that matches the title, for search engines
When the event is created, the URL is generated automatically from the title. It should keep reflecting it: that is what search engines read. If it no longer matches (for example a "-copy" added at the end after a duplication), click Edit next to the URL, clear it completely, then click OK: it is generated again from the current title.
Filter
Above the list, three drop-down lists filter by activity, teacher or venue, in addition to the usual WordPress search and statuses (All, Published, Drafts, Trash).
Find an event in two clicks
These filters save you from going through the whole list. Filter by activity to pick out all the classes of one kind at once (teacher training, meditation…), or by venue to see only what happens in a branch, for example.
To create an event, click Add new at the top of the list.
Edit an event
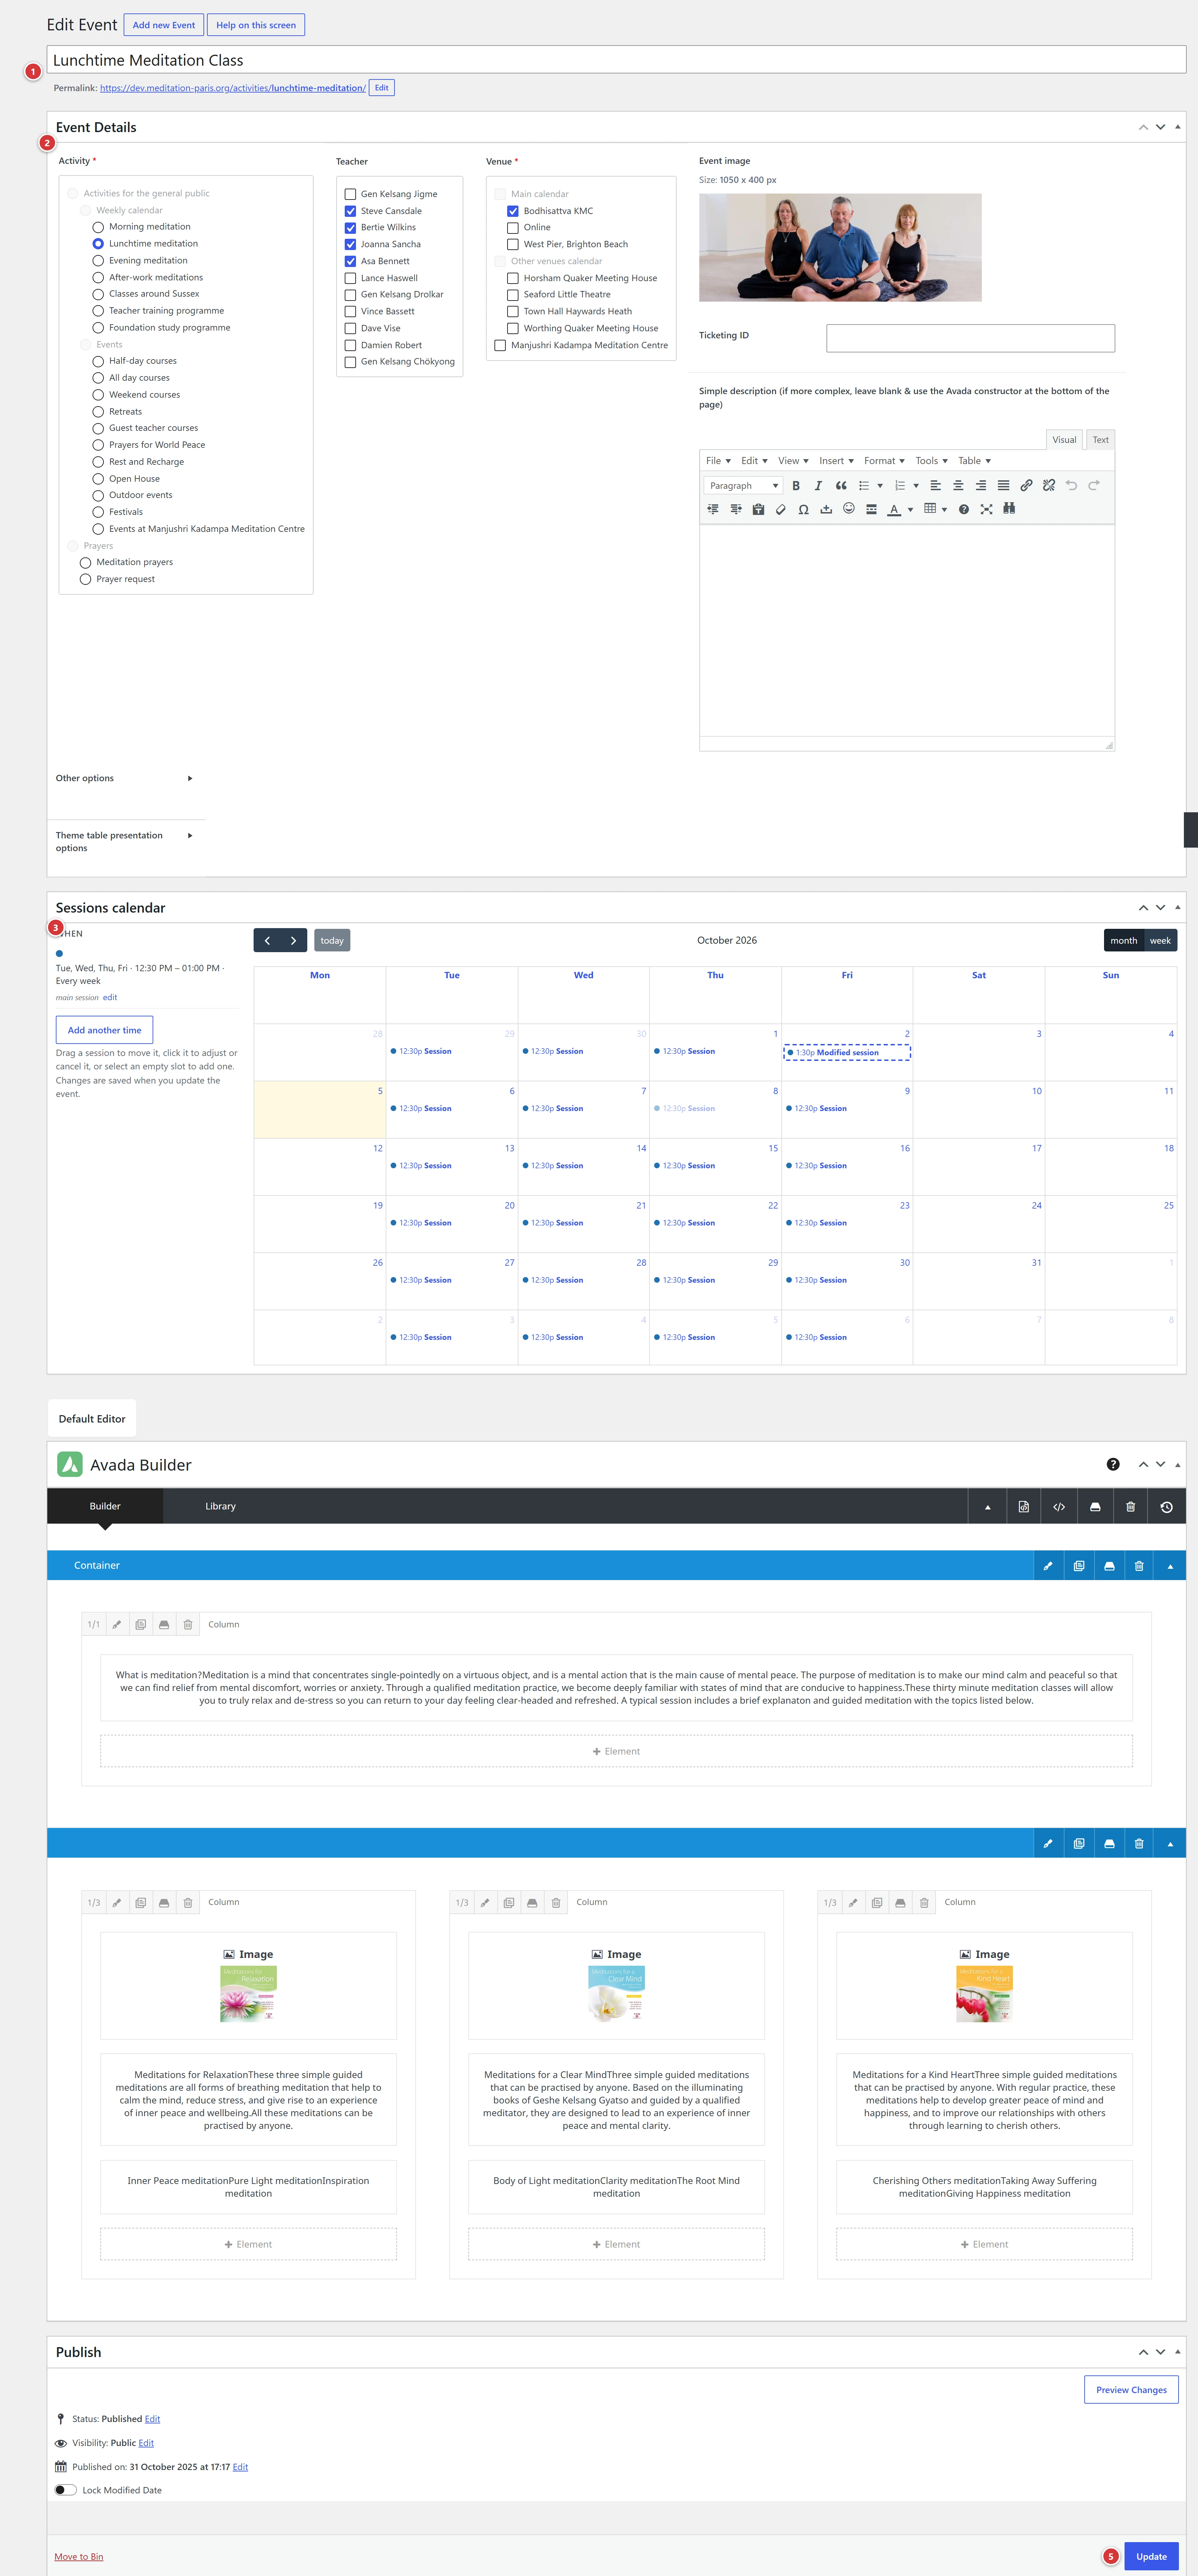
1 Title of the event (details). 2 Event Details: activity, teacher, venue, image (details). 3 Sessions calendar: the dates and times (details). 4 Description of the event. 5 Publish (or Update for an event already online): saves the event and puts it online.
Nothing is saved before \"Publish\" or \"Update\"
The dates and times entered in the sessions calendar are only taken into account when you click Publish or Update.
The title
This is the full name of the event, shown on its page. If the title is too long for the calendar box, see Short name for calendar in Other options.
Event Details
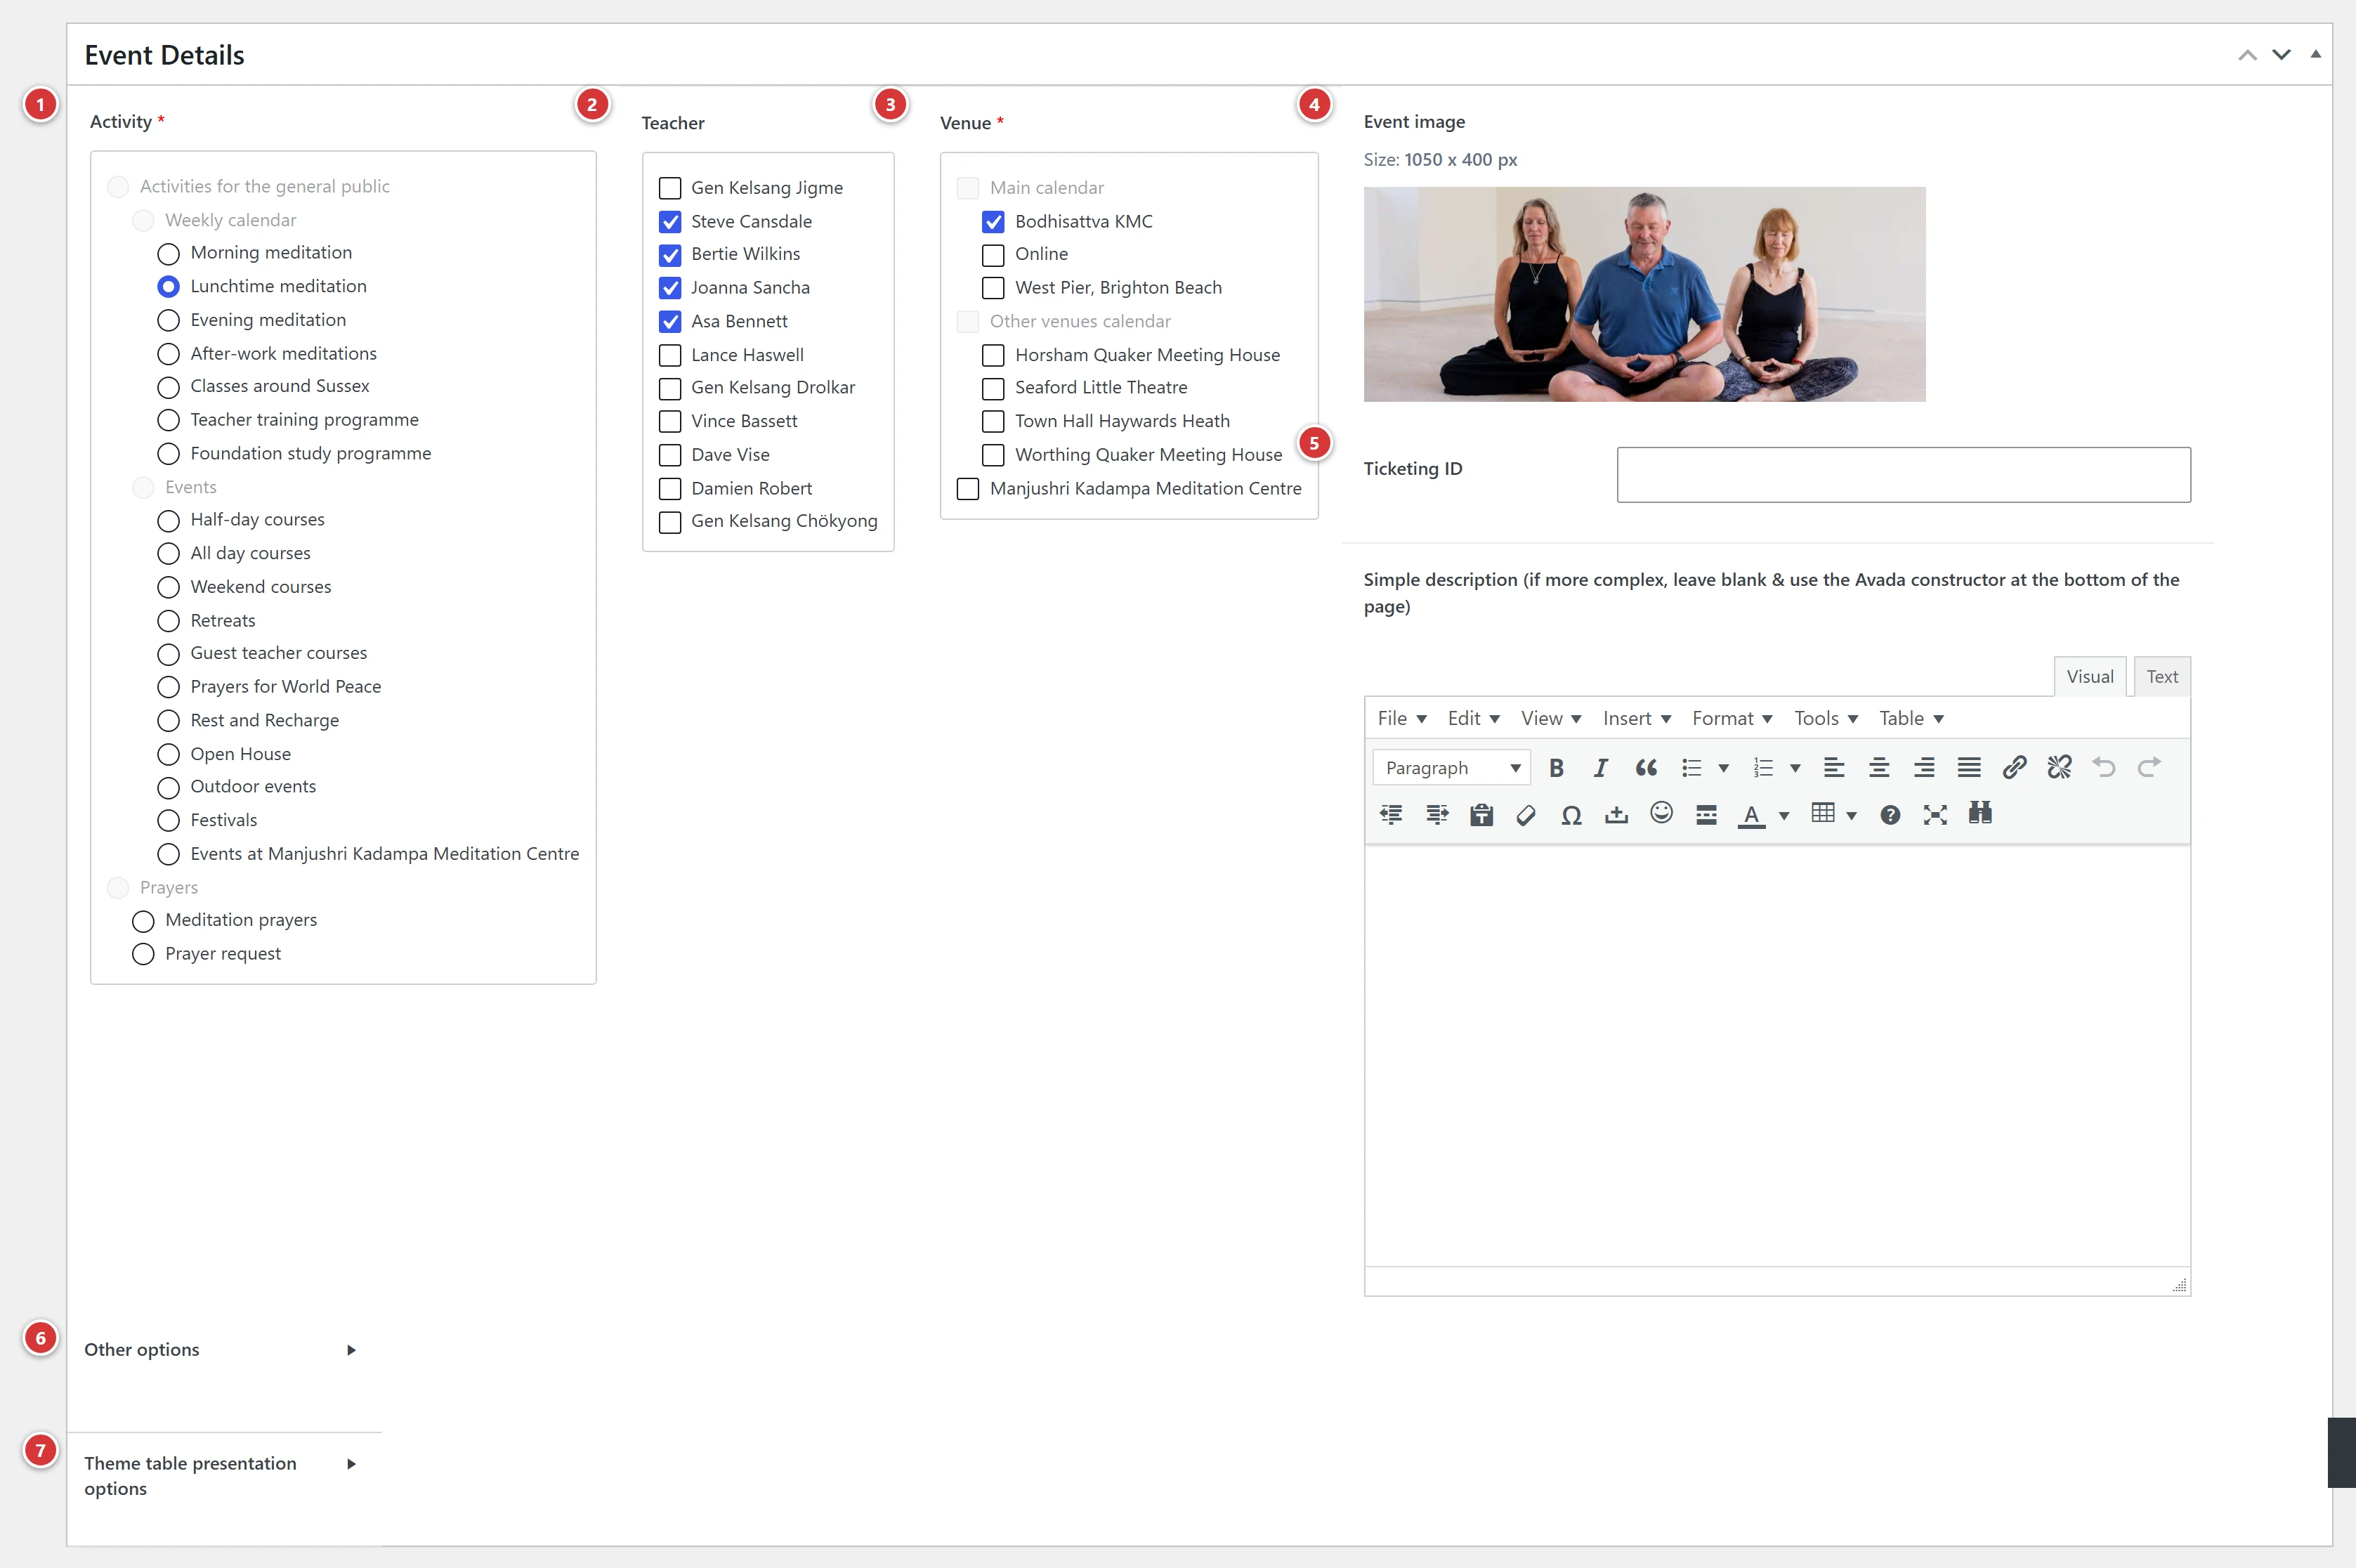
1 Activity. 2 Teacher. 3 Venue. 4 Event image. 5 Ticketing ID. 6 Other options: optional settings (details). 7 Theme table presentation options (details).
Activity
Required. One activity per event (Class, Retreat, Workshop…). It sets the event's colour in the calendar and on its page, and the group it belongs to in the "Upcoming" blocks. Activities are created on their own screen (see the Activities and venues page).
Teacher
Tick the teacher or teachers of the event. Several choices are possible. Their name and portrait appear on the event page.
They are shown in the order set on the Teachers screen: the first in the list is the resident teacher, and the others follow in the order you have given them.
Venue
Required. Tick the venue or venues where the event takes place. Several choices are possible, for example for an event that takes place both on site and online.
Event image
The image shown at the top of the event page. Required size: 1050 x 400 px.
Choose an image that crops well
The format is a wide, shallow banner: the image is cropped to fit it. Choose an image whose subject stays clearly visible once cropped. This is very important for images to display well across the whole site.
Ticketing ID
The event's number with the centre's ticketing service, if there is one. It is often the number or code that appears in the address (URL) of the event on the ticketing site. Leave it empty otherwise.
Other options
This section is collapsed: click Other options to open it. It is collapsed on purpose, so as not to clutter the screen you use to work on events. These settings are optional; you only touch them for special cases.
Short name for calendar
A shorter name, shown in the calendar box when the title is too long. The event page always shows the full title.
For example, "Lunchtime Meditation Class" becomes "Lunchtime 30min" in the box, and the full title reappears in the window that opens when you click it:
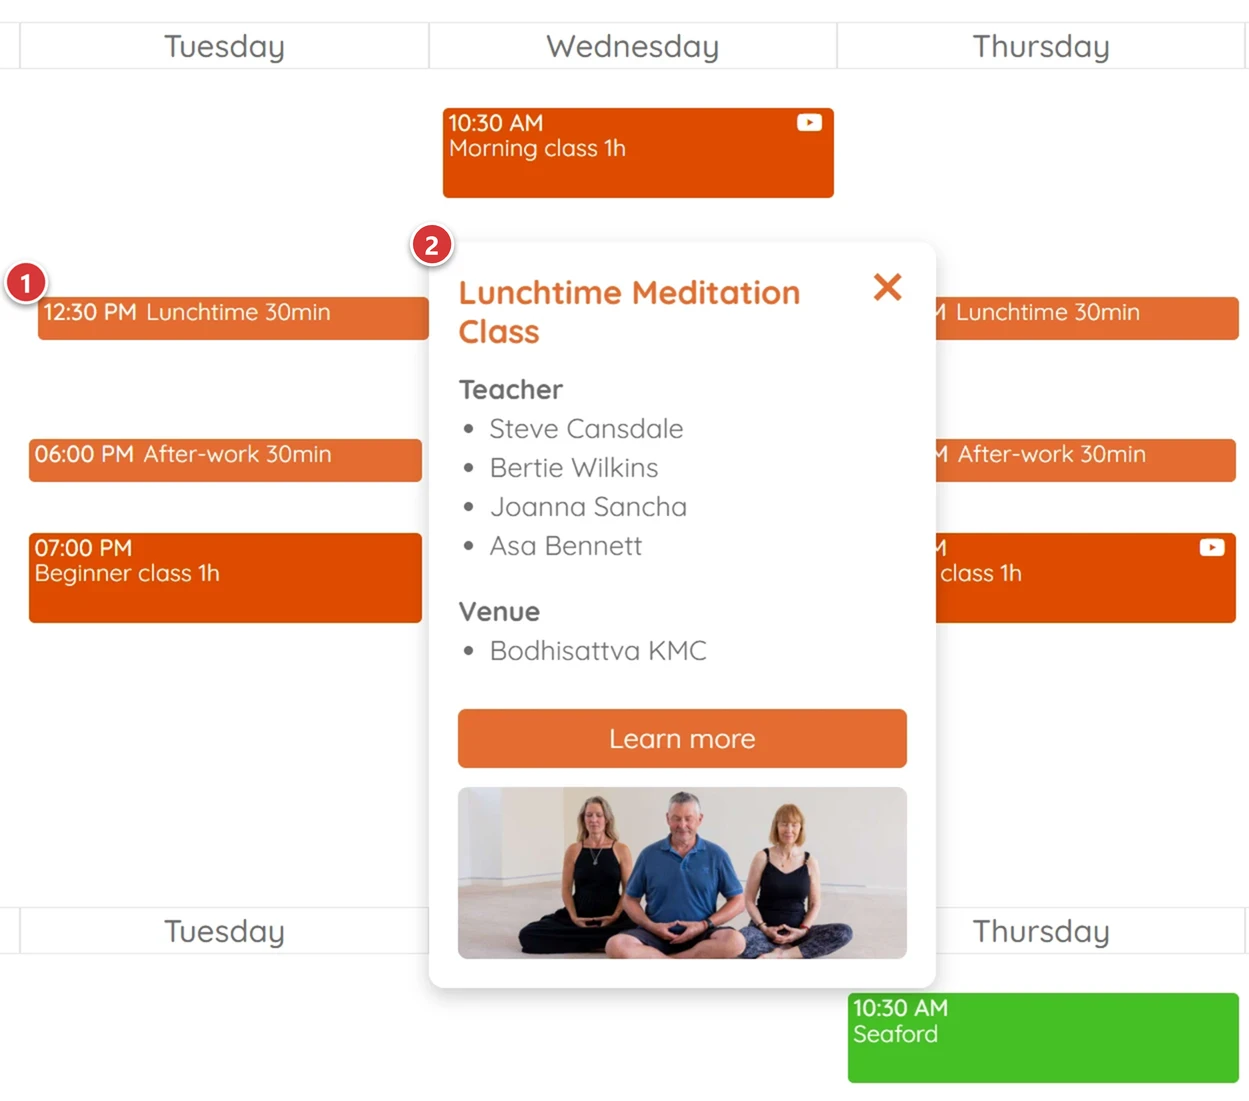
1 Short name, short enough to fit in the calendar box. 2 Full title of the event, as it appears in the event window and on its page.
Replacement color
Only fill this in if the event should have a colour different from that of its activity. One of the colours in the site palette (see Colours).
Custom colour
A colour outside the site palette. This field should normally never be needed: it is only there in case an event has to appear in a very particular way. A custom colour does not follow changes to the palette. It disappears as soon as a replacement colour is chosen.
Intro replacement
Below the image on the event page, the site writes two lines of introduction by itself. The Intro replacement line 1 and line 2 fields let you replace either of them with your own text.
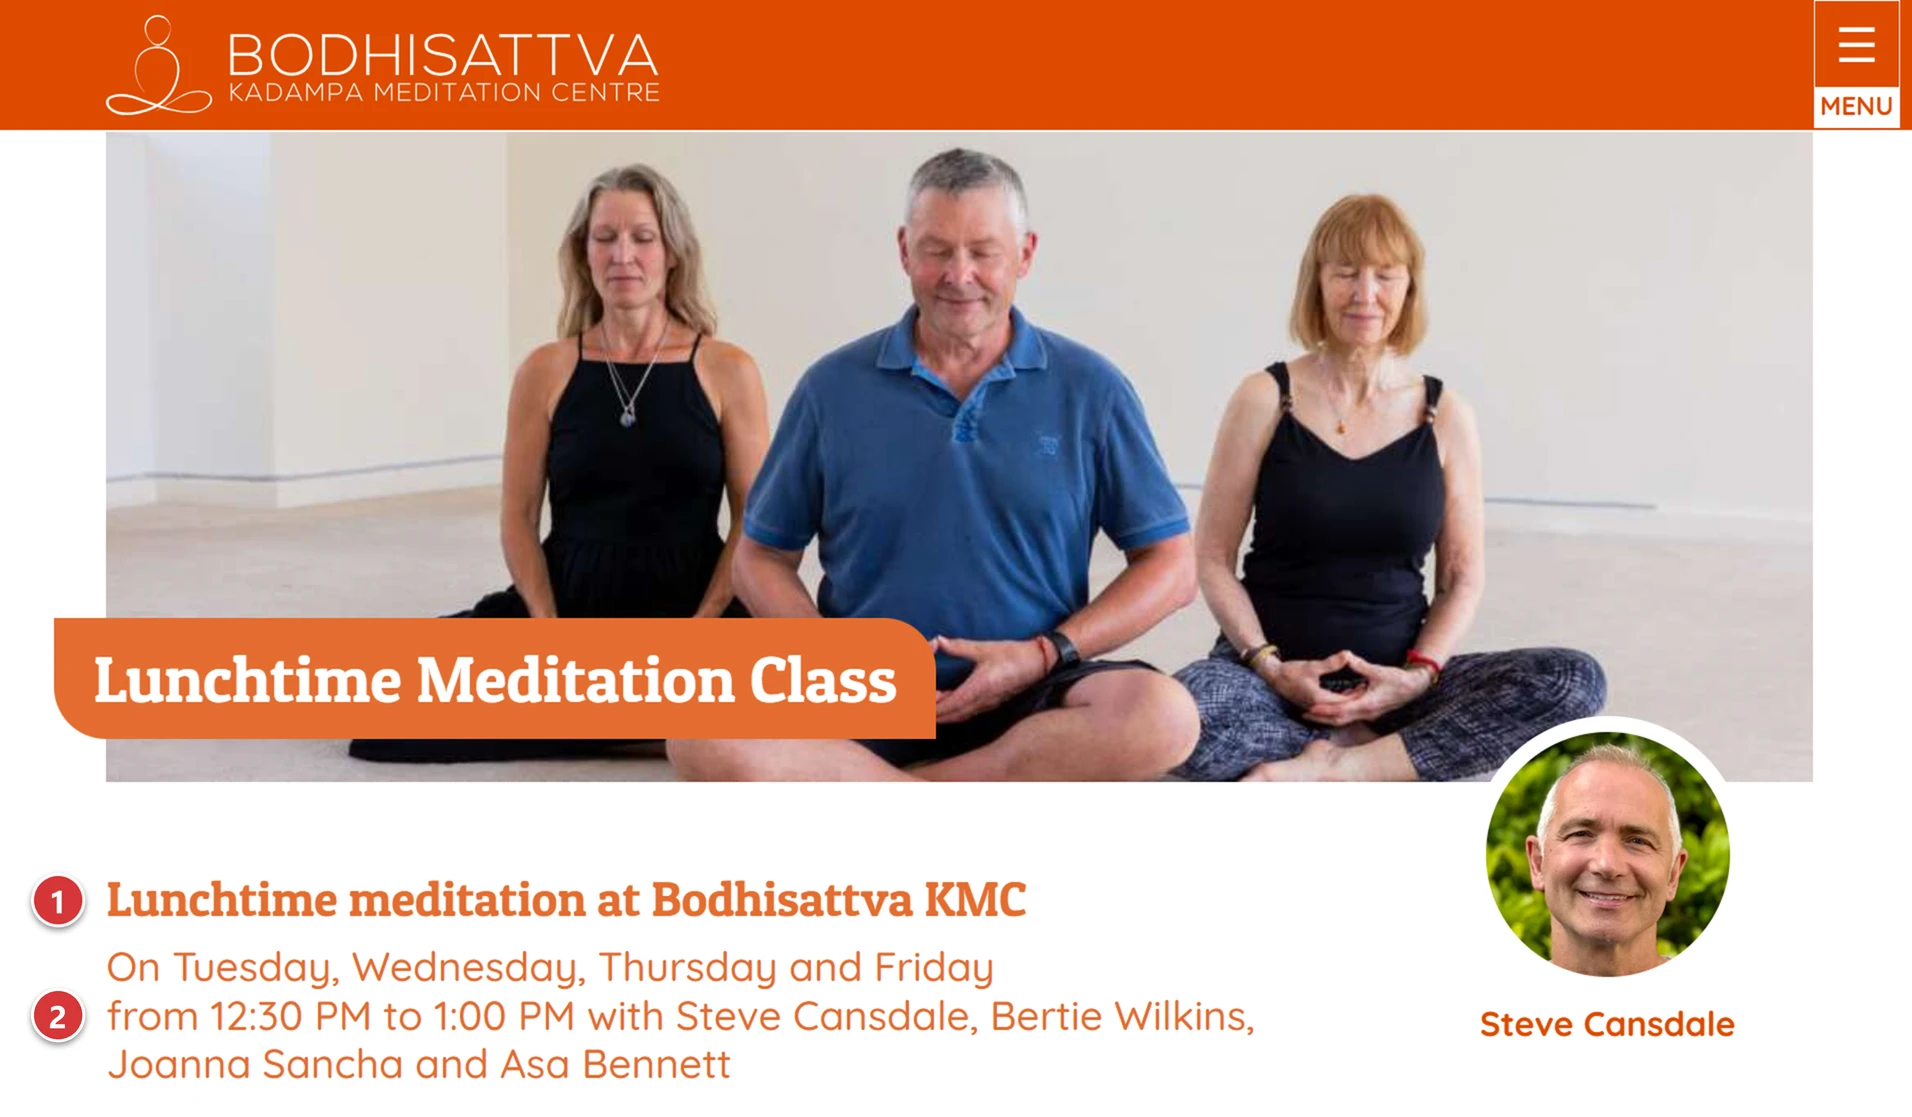
1 Intro replacement line 1: the heading of the introduction. Written automatically, it gives the activity and the venue. 2 Intro replacement line 2: the text that follows. Written automatically, it gives the days, the times and the teachers.
When should you customise the introduction?
Most of the time, the two lines written automatically are enough: leave the fields empty. But for some events, a tailor-made text makes people more eager to come. Think of it, for example, for a talk with an exceptional guest.
Replacement URL
For an event "outside the calendar": enter the address of the page to open instead of the event page.
Ideal for international festivals
A festival that already has its own site, or its page on the tradition's site, does not need a description here. Just enter the title and the days: the event appears in the calendar. With the Replacement URL, clicking the event, in the calendar as in Upcoming events, opens the festival page directly.
Pricing
The prices shown on the page.
- By default: the centre's usual prices.
- Do not display: no price.
- Choose one...: brings up the Pricing choice list, where you select a particular price (see the Pricing and Timetables page).
Timetable
The timetable shown on the page. The same three choices: By default, Do not display, Choose one... (Timetable choice list).
Pricing and Timetable are required
They are already set to By default: you only touch them to change this behaviour.
Display reception conditions
Ticked by default: the page shows the message about the reception conditions. Untick it to remove it.
This option was created at the time of Covid, to show the health rules. Today it is used to give any useful information about the welcome: the room is air-conditioned, herbal tea will be offered to participants, and so on.
Link two events
The Linked event field is used to connect two events that go together. The typical case is a weekend course split into two events, one on Saturday and one on Sunday: each is a lighter commitment for people who are hesitating, but the two are still presented together (see Sessions).
On the Saturday page, a line appears below the introduction: the day and the title of the linked event.
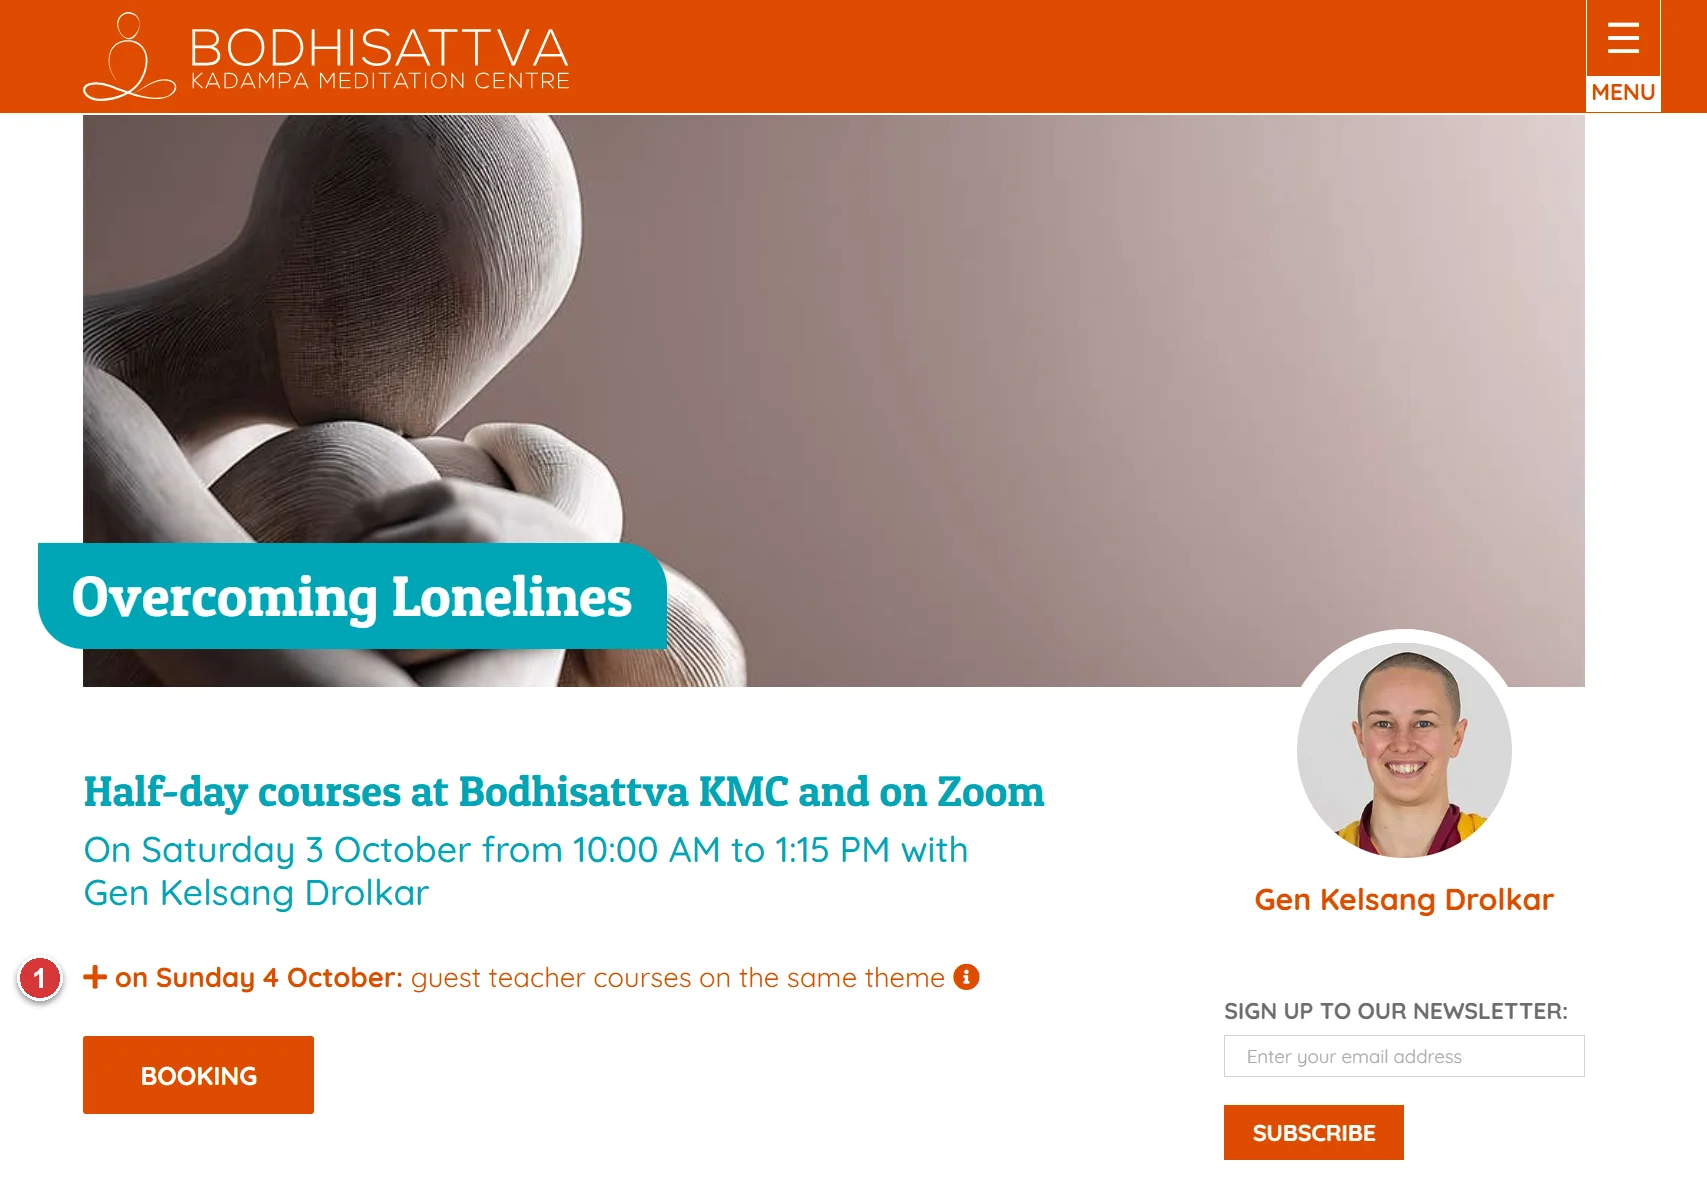
1 Linked event line: a link. Clicking it opens the other event's page directly, which in turn shows a link back to this page.
To link them:
- Open the Saturday event's edit screen and expand Other options.
- In Linked event, type the beginning of the title of the Sunday event and choose it from the list.
- Click Update (or Publish).
The link is made in both directions: the Sunday edit screen immediately shows Saturday in its own Linked event field, without you having to enter anything there. On the site, each event page then offers a link to the other, in the form "+ on Sunday 12 October: activity name on the same theme".
- An event can only be linked to one other event.
- To remove the link, empty the field on either of the two edit screens: it disappears from the other one too.
Table of course themes
Announcing the theme of each session of a regular class gives visitors a reason to come: we have found that it draws noticeably more interest than a plain timetable. And the work has already been done: the EPC prepares the programme. All that remains is to show it on the event page, just below the title and its two introduction lines.
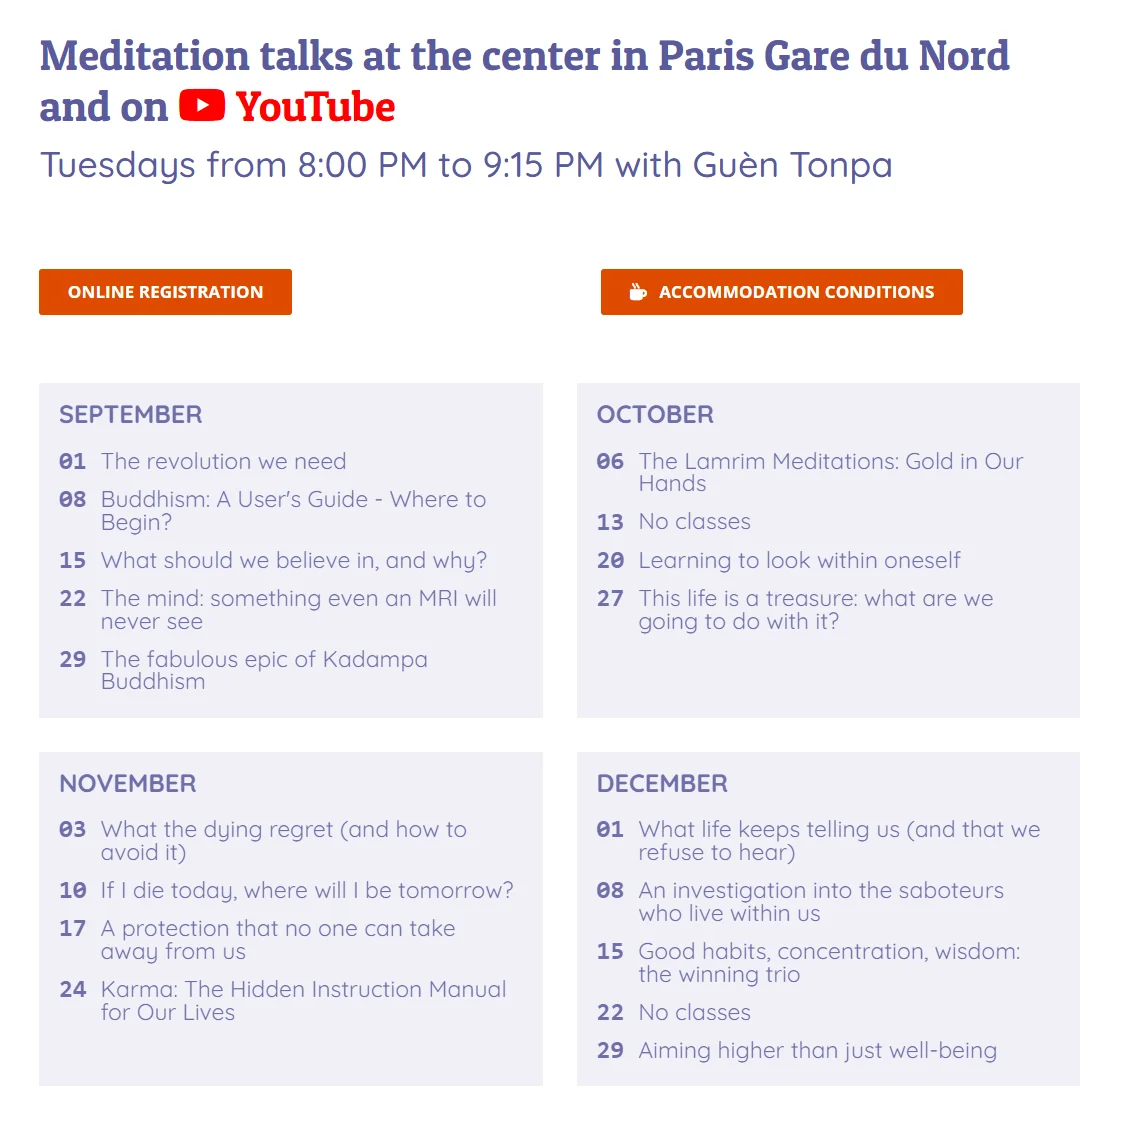
Example: the Tuesday evening class at KMC Paris, with its themes day by day, grouped by month.
Formatting such a list by hand is slow and tedious (we have been through it, running a centre). So the site does it for you: you paste the "date, theme" list copied from your yearly planner (Excel, Google Sheets…), and it lays it out, one frame per month, with the days at the start of each line. A few seconds of copy and paste are enough.
Make the most of it
This is a very useful feature for a weekly class: little effort, a polished result, and more visitors walking through the door.
Entering the themes
On the event screen, expand Theme table presentation options.
- In your spreadsheet, select the two columns: the date on the left, the theme on the right, one line per session.
- Copy them, then paste them into Correct formatting of the table of course themes.
- Click Preview formatting: the field is immediately laid out by month, as visitors will see it. Check it.
- Click Update (or Publish): nothing is online before that.
Write the dates in the right order
Dates are entered in the usual order for the site's language: day/month/year for a site in
British English, for example 20/04/2021. A day and a month swapped round would give the wrong
month.
To change a theme or add weeks
Once laid out, the table is no longer the original list. The simplest thing is to empty the field, paste the complete list again from your spreadsheet, then click Preview formatting.
The other settings
| Setting | What it is for |
|---|---|
| Asterisks in the table | A text shown below the table, for notes linked to certain themes (for example "* Class exceptionally online"). |
| Automatic formatting of theme tables | On by default: the pasted table is reformatted and grouped by month. Off: it is shown exactly as you pasted it, with no grouping. |
| Activate the table | On by default. Untick it to hide the themes on the page without losing what you entered: just tick it again to show them again. |
Description
The Simple description field is enough for a text without complex formatting: a few paragraphs, with some words in bold. For a more elaborate page (columns, images, buttons), leave this field empty and use the Avada builder at the bottom of the screen.
The sessions calendar
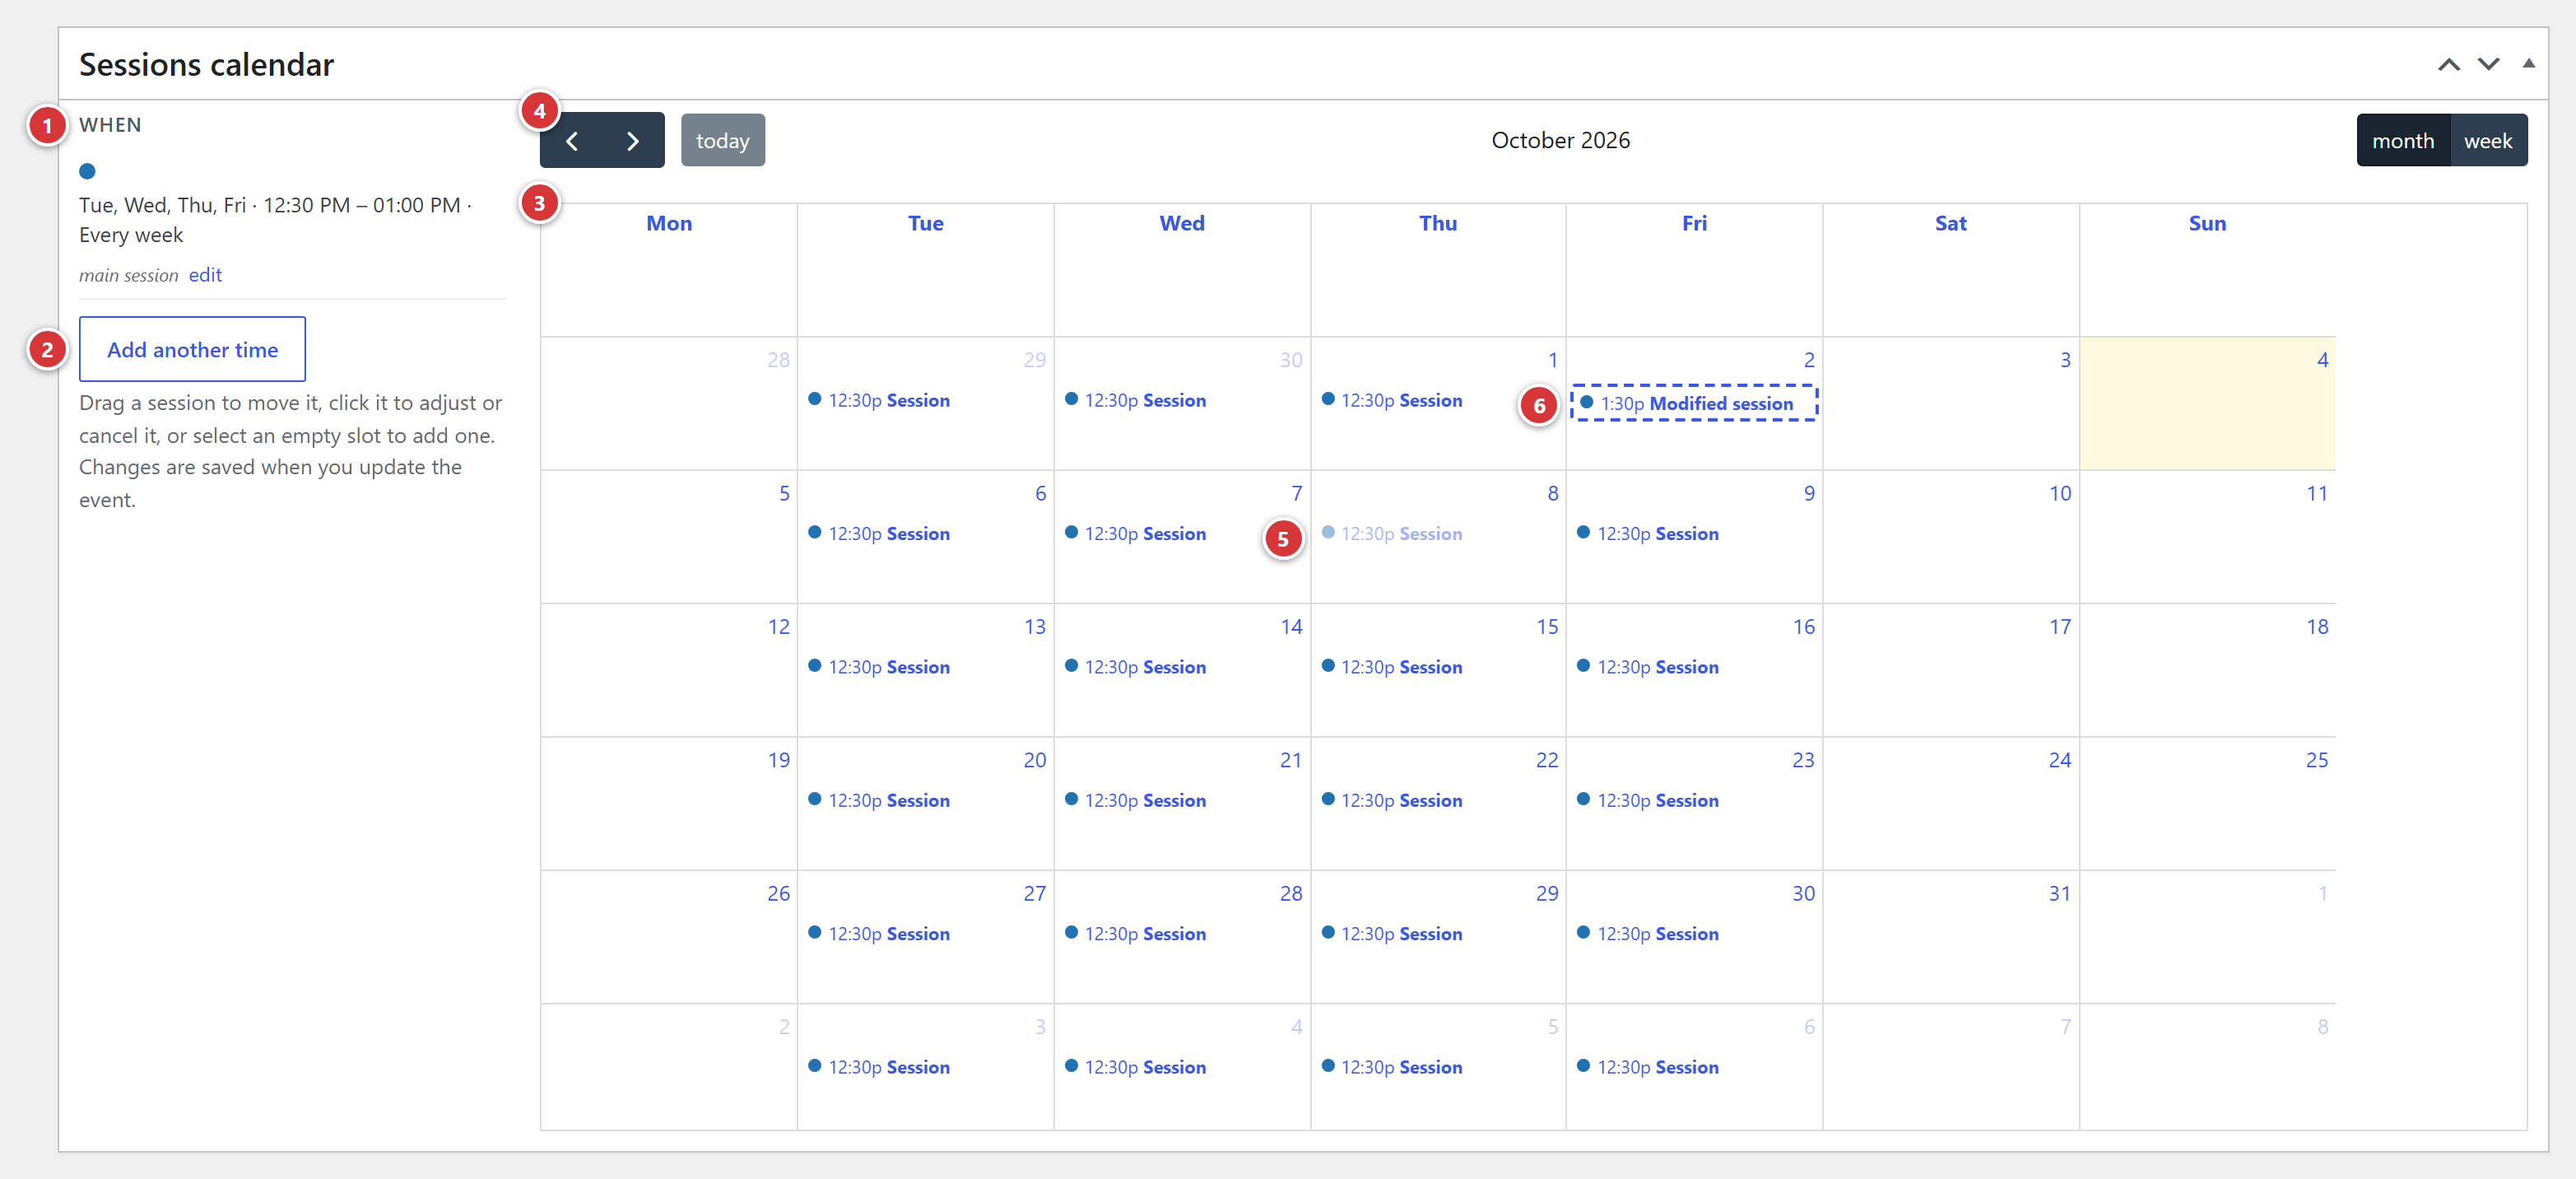
1 When: the event's times. 2 Add a session or Add another time. 3 The calendar: one session per coloured block. 4 Go from one month to another, or from the month view to the week view. 5 A cancelled session: it stays visible, faded. 6 A modified session: it carries the "Modified session" label and a dotted border.
This is the only place where you enter the dates of an event. On the left, the When panel lists the times; on the right, a calendar shows all the resulting sessions, as visitors will see them.
An event has a main time (the main session), which can repeat, and possibly other times. Each day on which it takes place is a session.
The calendar opens on the first upcoming session, failing that on the last past session, failing that on today.
Create the main session
On a new event, the calendar is empty and shows: "Click a day in the calendar to set the main session."
- Click Add a session, or click a day in the calendar directly.
- Fill in the window that opens (see below).
- Click Save. The sessions appear in the calendar.
The main session window
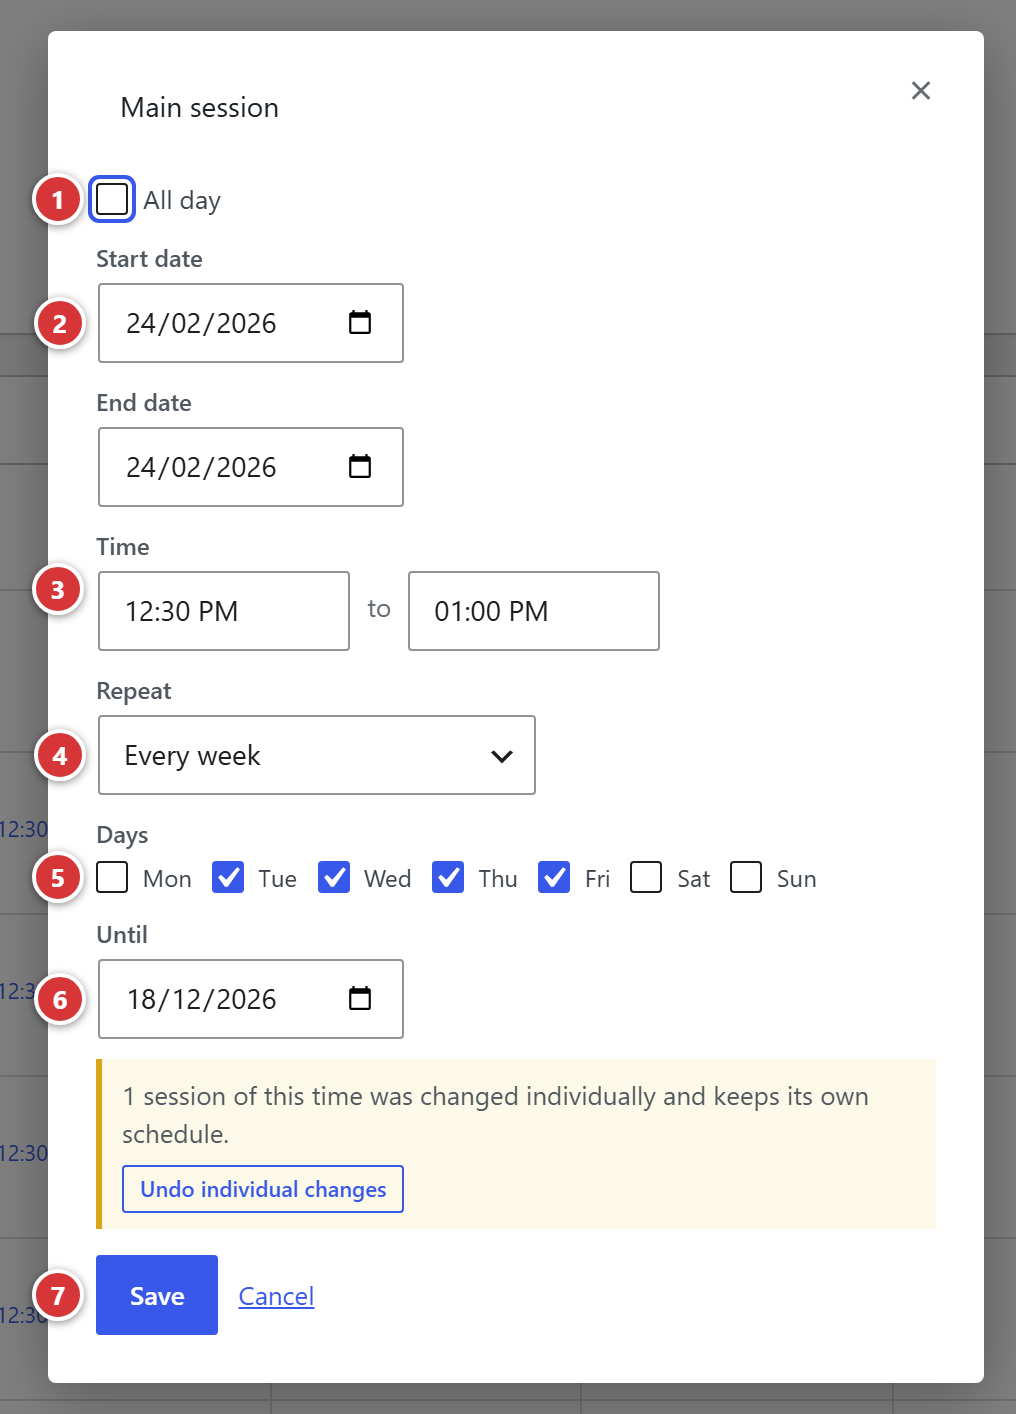
1 All day. 2 Start date and end date. 3 Time. 4 Repeat. 5 Days of the week. 6 Until. 7 Save and Cancel.
| Field | Purpose |
|---|---|
| All day | Ticked: no time is shown anywhere (calendar, page, "Upcoming" blocks). |
| Start date | The first day. |
| End date | The last day of the first session. For a one-day event, the same date as the start. For a retreat over several days, the last day. |
| Time | Start time, then end time (to). Hidden if the event lasts all day. |
| Repeat | Never (Not a recurring event), Every day, Every week, Every 2 weeks, Every month or Every year. |
| Days | Appears for a weekly repeat: tick one or more days (for example Tuesday, Wednesday and Friday). With no ticks, the session repeats on the same day of the week as the start date. If you tick days, include the day of the start date, otherwise the first session is skipped. |
| Until | Appears when there is a repeat: the date of the last possible session. |
With no repeat end date
The calendar shows a message: "No recurrence end date: sessions are generated through …". The site then plans the sessions for about two years. To extend them later, simply update the event (Update button).
If a date or a time is inconsistent, a red message appears in the window and nothing is saved: "The end date must be on or after the start date.", "For same-day events, the end time must be after the start time.", "The recurrence end date must be after the event end date."
Several times in the same event
A class may take place "on Tuesdays at 7 pm and on Saturdays at 10 am". In the When panel, click Add another time. The Additional time window has the same fields as the main session window, except All day.
Each time is listed in the When panel, with the edit and delete links (deleting removes all the sessions of that time, after confirmation). Each time has its own colour in the calendar, to help you find your way.
Act on a single session
The calendar lets you change a single session without changing the others. The help text of the When panel reminds you: "Drag a session to move it, click it to adjust or cancel it, or select an empty slot to add one."
| I want to… | I do this… |
|---|---|
| Change the time of a session | I click it, change the time (From … to …), then Apply. To put it on another day, I drag it to its new place (this also changes the time). In the Week view, I stretch its bottom edge to change its length. |
| Add an extra session | I select an empty slot in the calendar. The session is labelled Extra session. |
| Cancel a session | I click it, then Cancel this session. It stays visible, struck through, in the editor; it disappears from the site. |
| Restore a cancelled session | I click it, then Restore this session. |
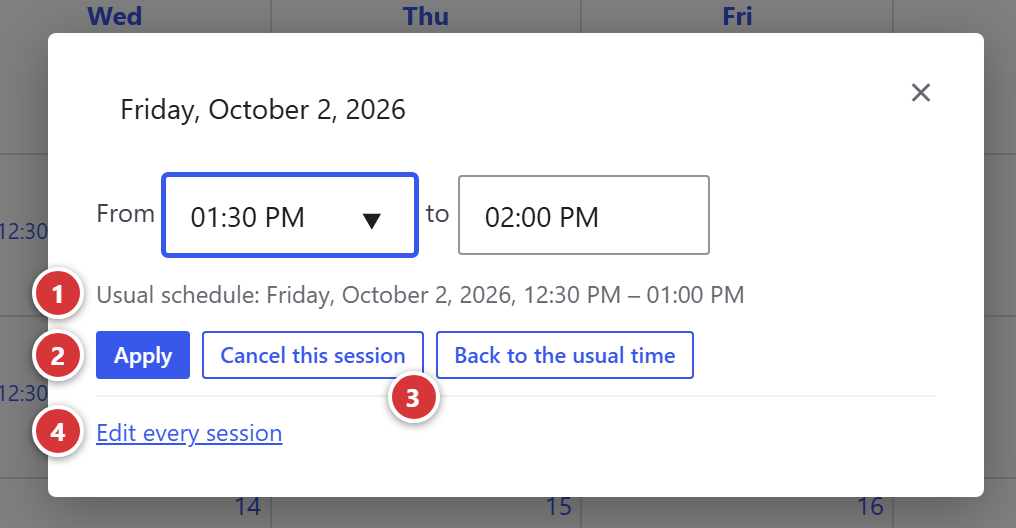
1 Time of this session. 2 Apply: confirms the new time. 3 Cancel this session. 4 Edit every session: goes back to the settings of the time.
A session that has been moved or corrected is labelled Modified session. Its window reminds you of the usual schedule, and the Back to the usual time button puts it back like the others. For an extra session, the cancel button is called Remove.
To change all the sessions of a time at once, click the Edit every session link in the window. If some sessions have been changed individually, a message says so ("3 sessions of this time were changed individually and keep their own schedule.") and an Undo individual changes link brings them back to the usual time.
Reminder: save the event
Cancelling or moving a session in the calendar changes nothing on the site until you click Update.
Frequently asked questions
My event does not appear in the calendar. Check that it is published (and not a draft), that it has a main session in the sessions calendar, and that an activity is chosen.
A weekly class stops when I want to extend it. In the sessions calendar, click the edit link of the time and change the Until date, then click Update.
I moved a session by mistake. Click the session, then Back to the usual time. To undo changes to several sessions, use Undo individual changes.
The calendar shows "The calendar could not be refreshed." Try again by changing the session once more. If the message persists, let the webmaster know.
How do I delete an event? In the list, hover over it and click Trash. If you only want it to disappear from the calendar but not from the site, set it back to draft instead.